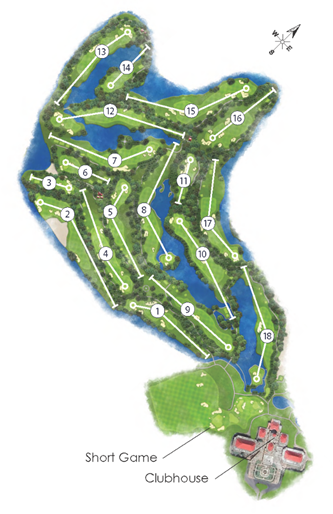
West Course
The second Sir Nick Faldo design championship course, West Course, opened in October 2020. The West Course has its distinctive differences from the East Course, of which are defined by undulating fairways and testing Paspalum greens. During your round you will come across various water features and statues such as a statue of the great Khmer King Jayavarman VII and a representation of the Terrace of the Elephant. Another unique characteristic is the Dragon Lake, located in the center of the course, it does create some challenges on your way to the green. In between all the exciting features, three crafted wooden tee-houses are there to keep you hydrated in Cambodia`s tropical climate. Here you can relax with a nice meal or a refreshing drink while absorbing the surroundings. The West Course is a rewarding test of skill for players of all levels, featuring 5 sets of tees, starting at 4,935 yards, right through to 7,249 yards.
Hole by hole info:
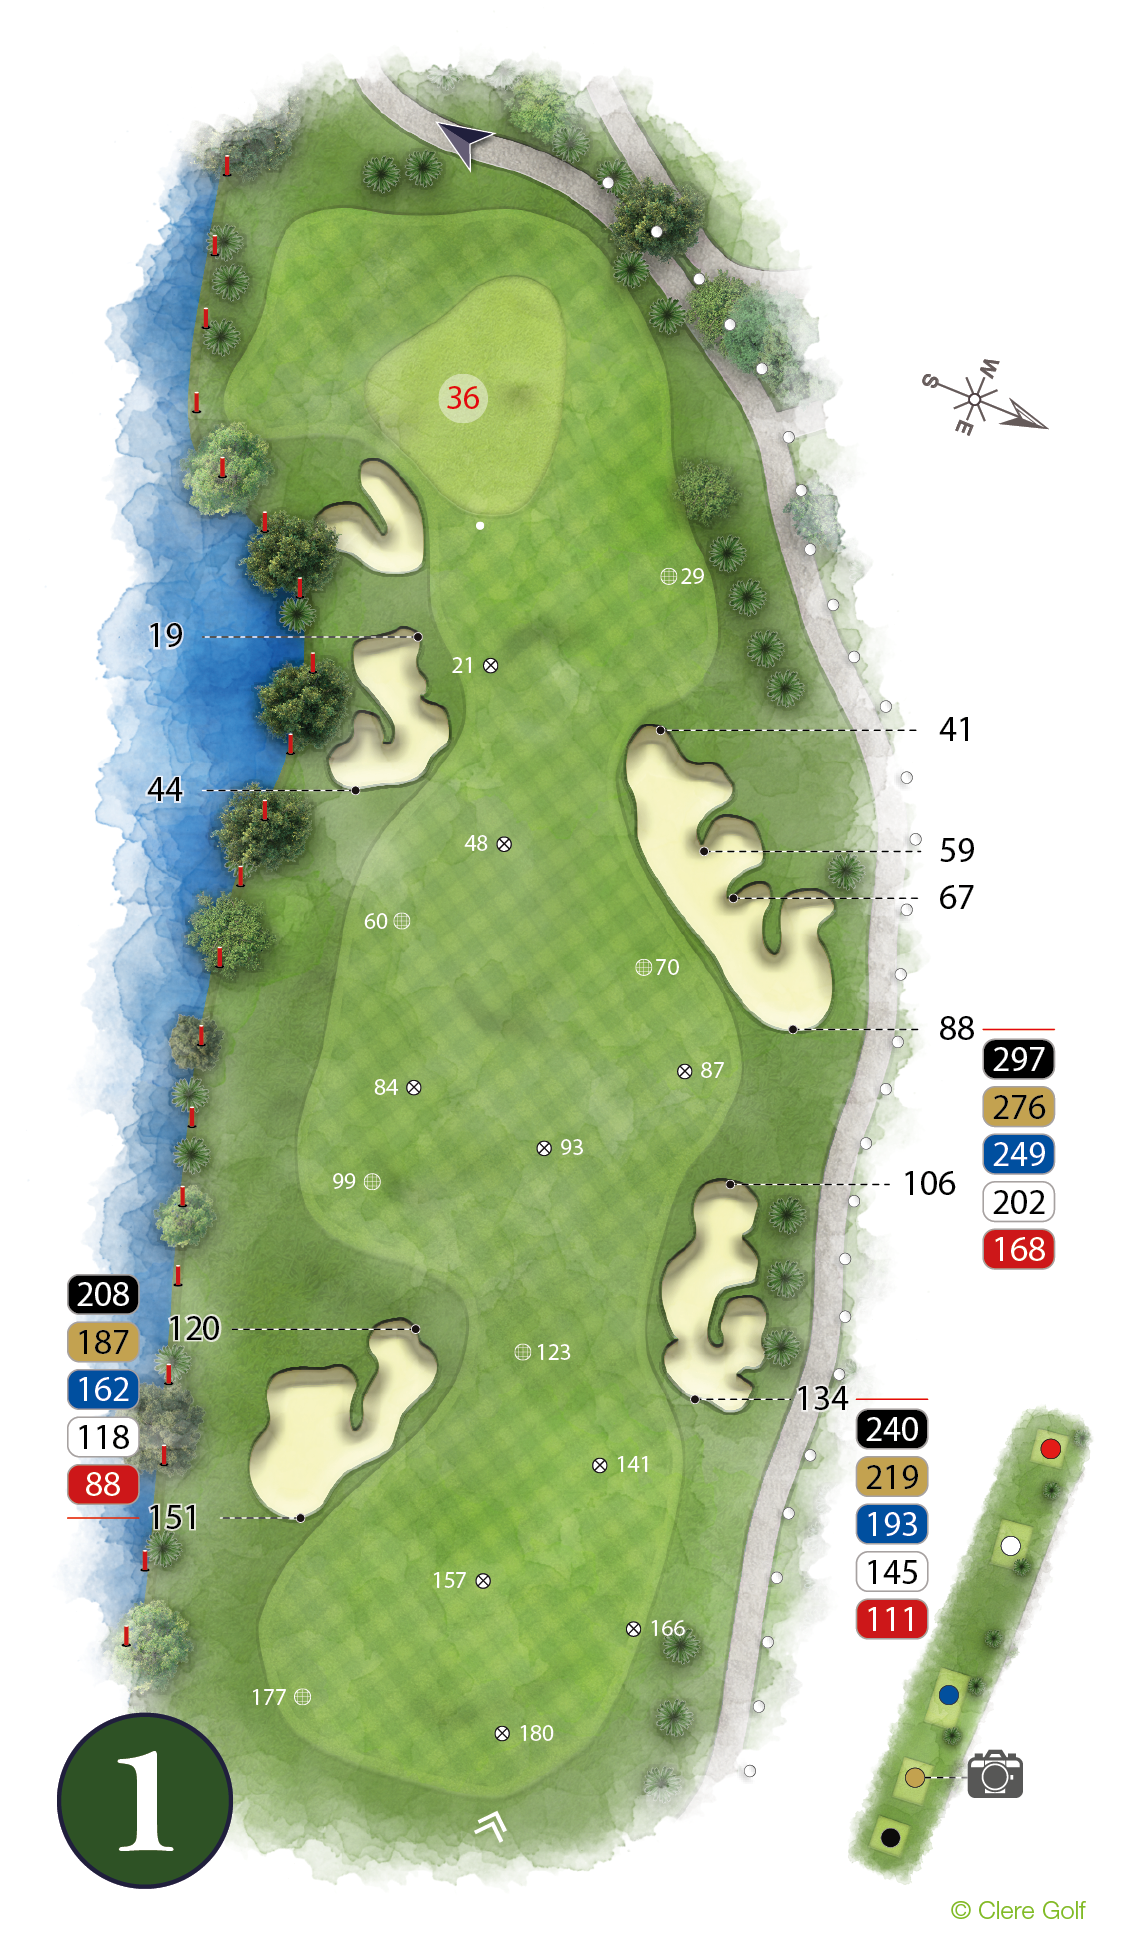

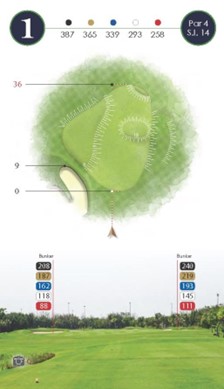
HOLE 1 PAR 4
Pro’s Tip:
A gentle opening hole. Hit a solid drive down the middle and you will be left with a short iron or wedge for your approach. The best side to miss this green is right. Anything left of this green will leave a tricky up and down.
Designer’s Notes:
A gentle opening hole. Hit a solid drive down the middle and you will be left with a short iron or wedge for your approach. The best side to miss this green is right. Anything left of this green will leave a tricky up and down.


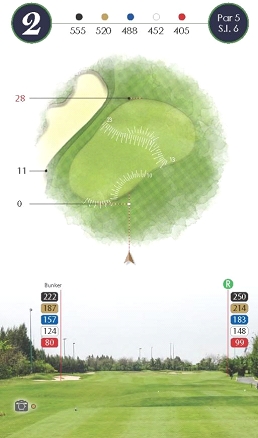
HOLE 2 PAR 5
Pro’s Tip:
There are multiple ways to play this par 5. The longest hitters can try to reach this green in 2, the green has lots of space to the right its quite inviting. If your laying up you need to hit over the bunkers on the right.
Designer’s Notes:
There are multiple ways to play this par 5. The longest hitters can try to reach this green in 2, the green has lots of space to the right its quite inviting. If your laying up you need to hit over the bunkers on the right.
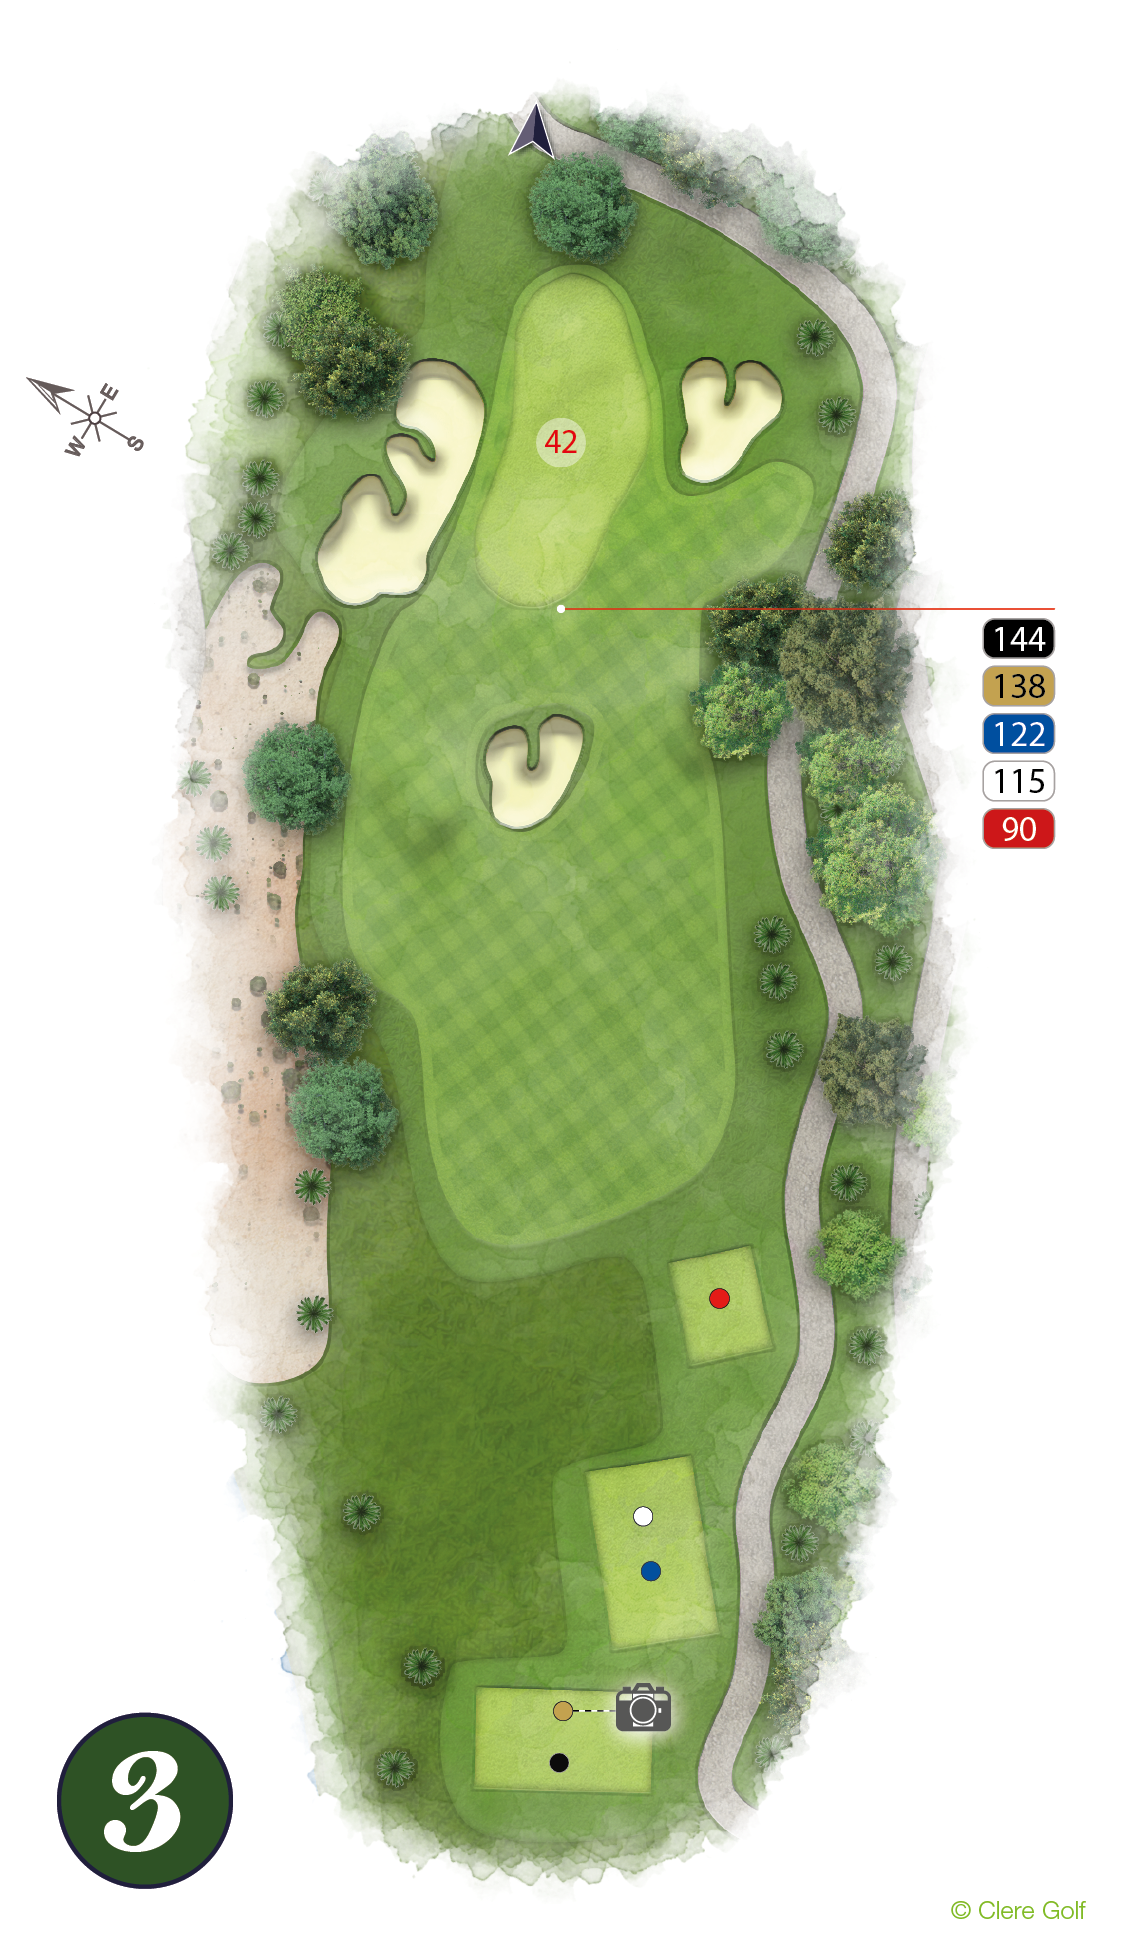
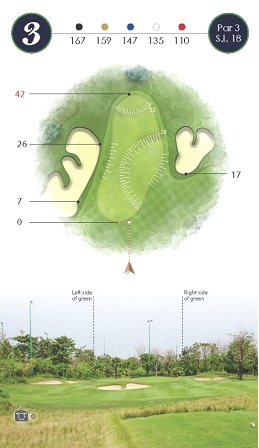
HOLE 3 PAR 3
Pro’s Tip:
The shortest Par 3 on the West course. Take extra care when putting to a front pin location. Big slopes to the right make this green quite tricky!
Designer’s Notes:
The shortest Par 3 on the West course. Take extra care when putting to a front pin location. Big slopes to the right make this green quite tricky!
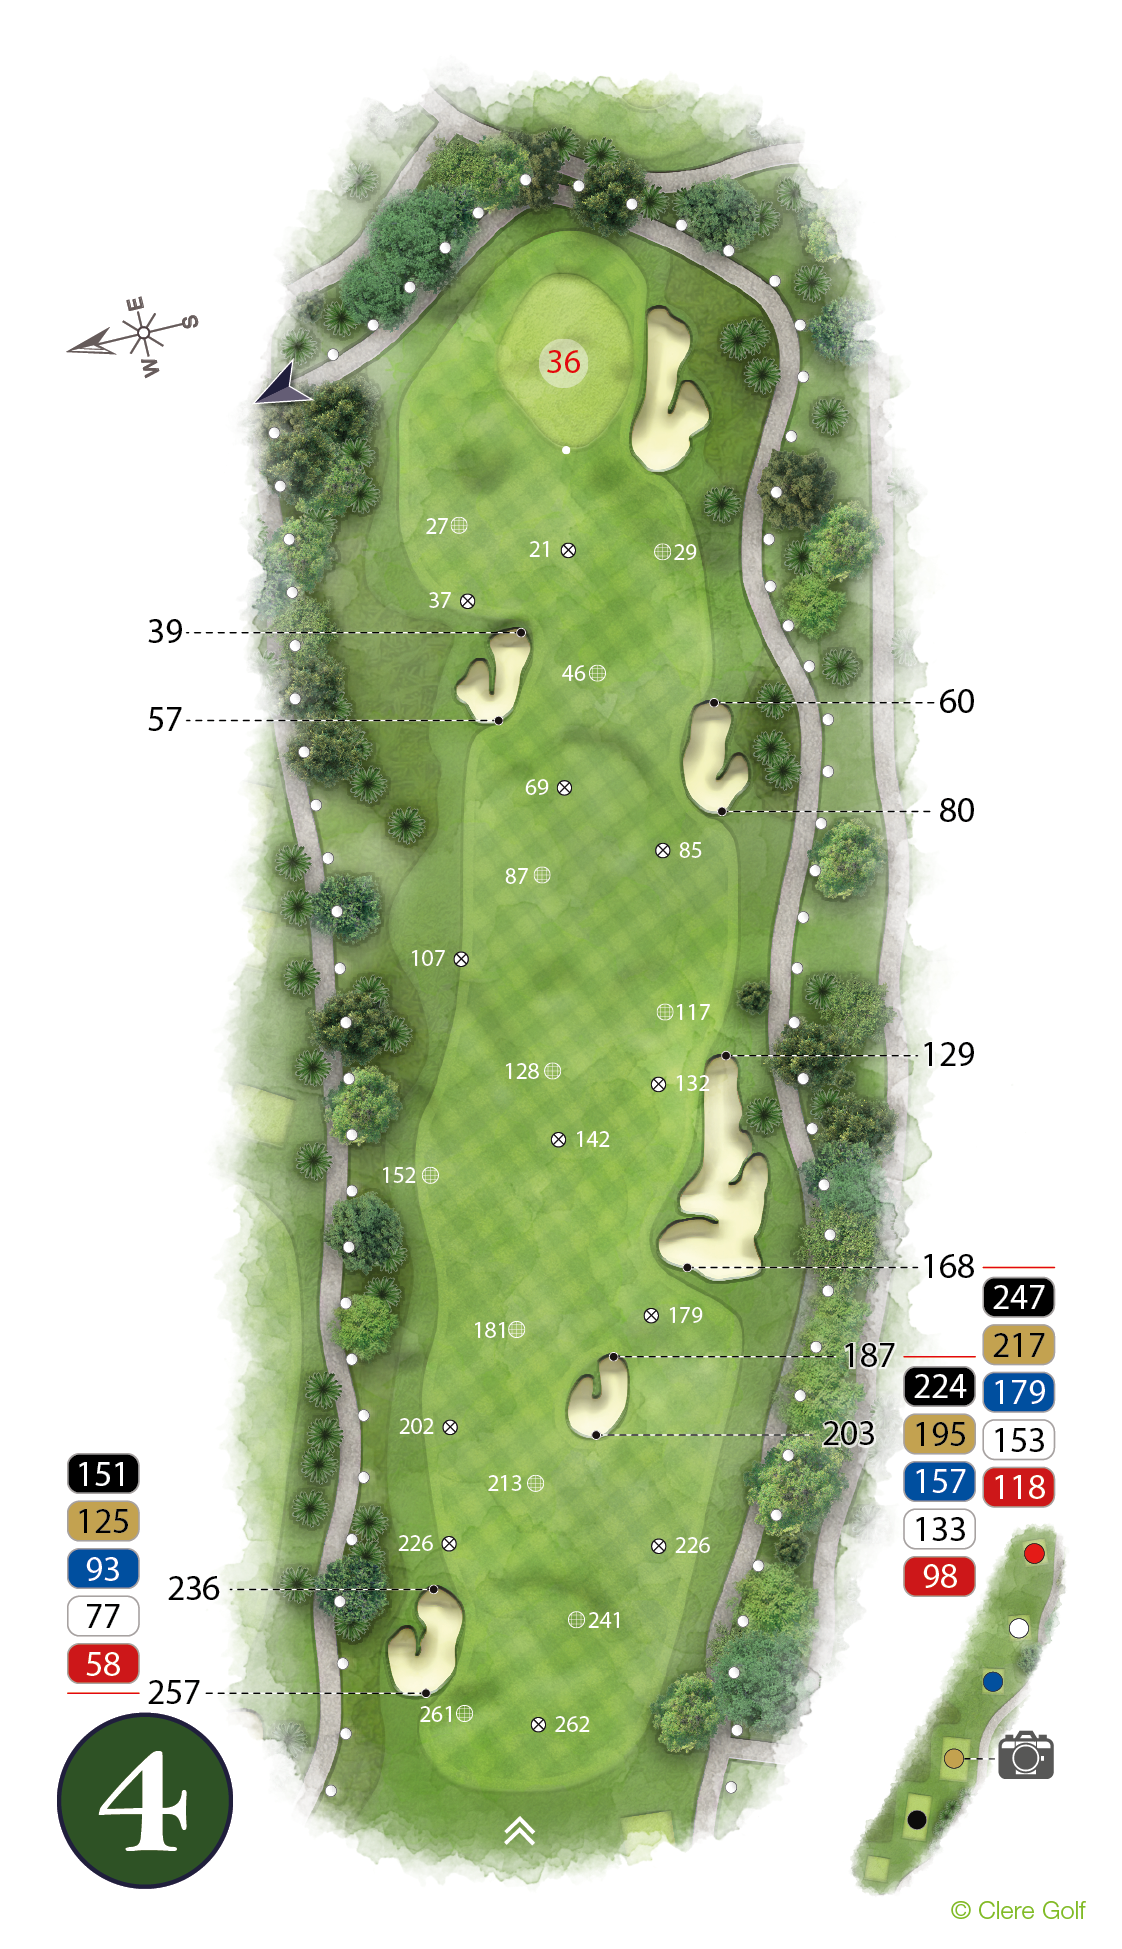
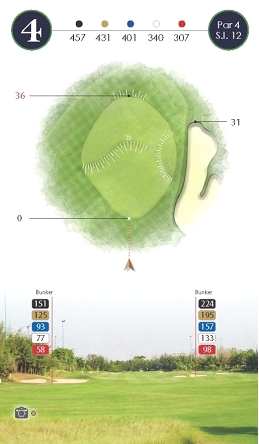
HOLE 4 PAR 4
Pro’s Tip:
Long and straight! Out of bounds both right and left. The green has 2 tiers. If the pin is at the back play for the middle of the green.
Designer’s Notes:
Long and straight! Out of bounds both right and left. The green has 2 tiers. If the pin is at the back play for the middle of the green.
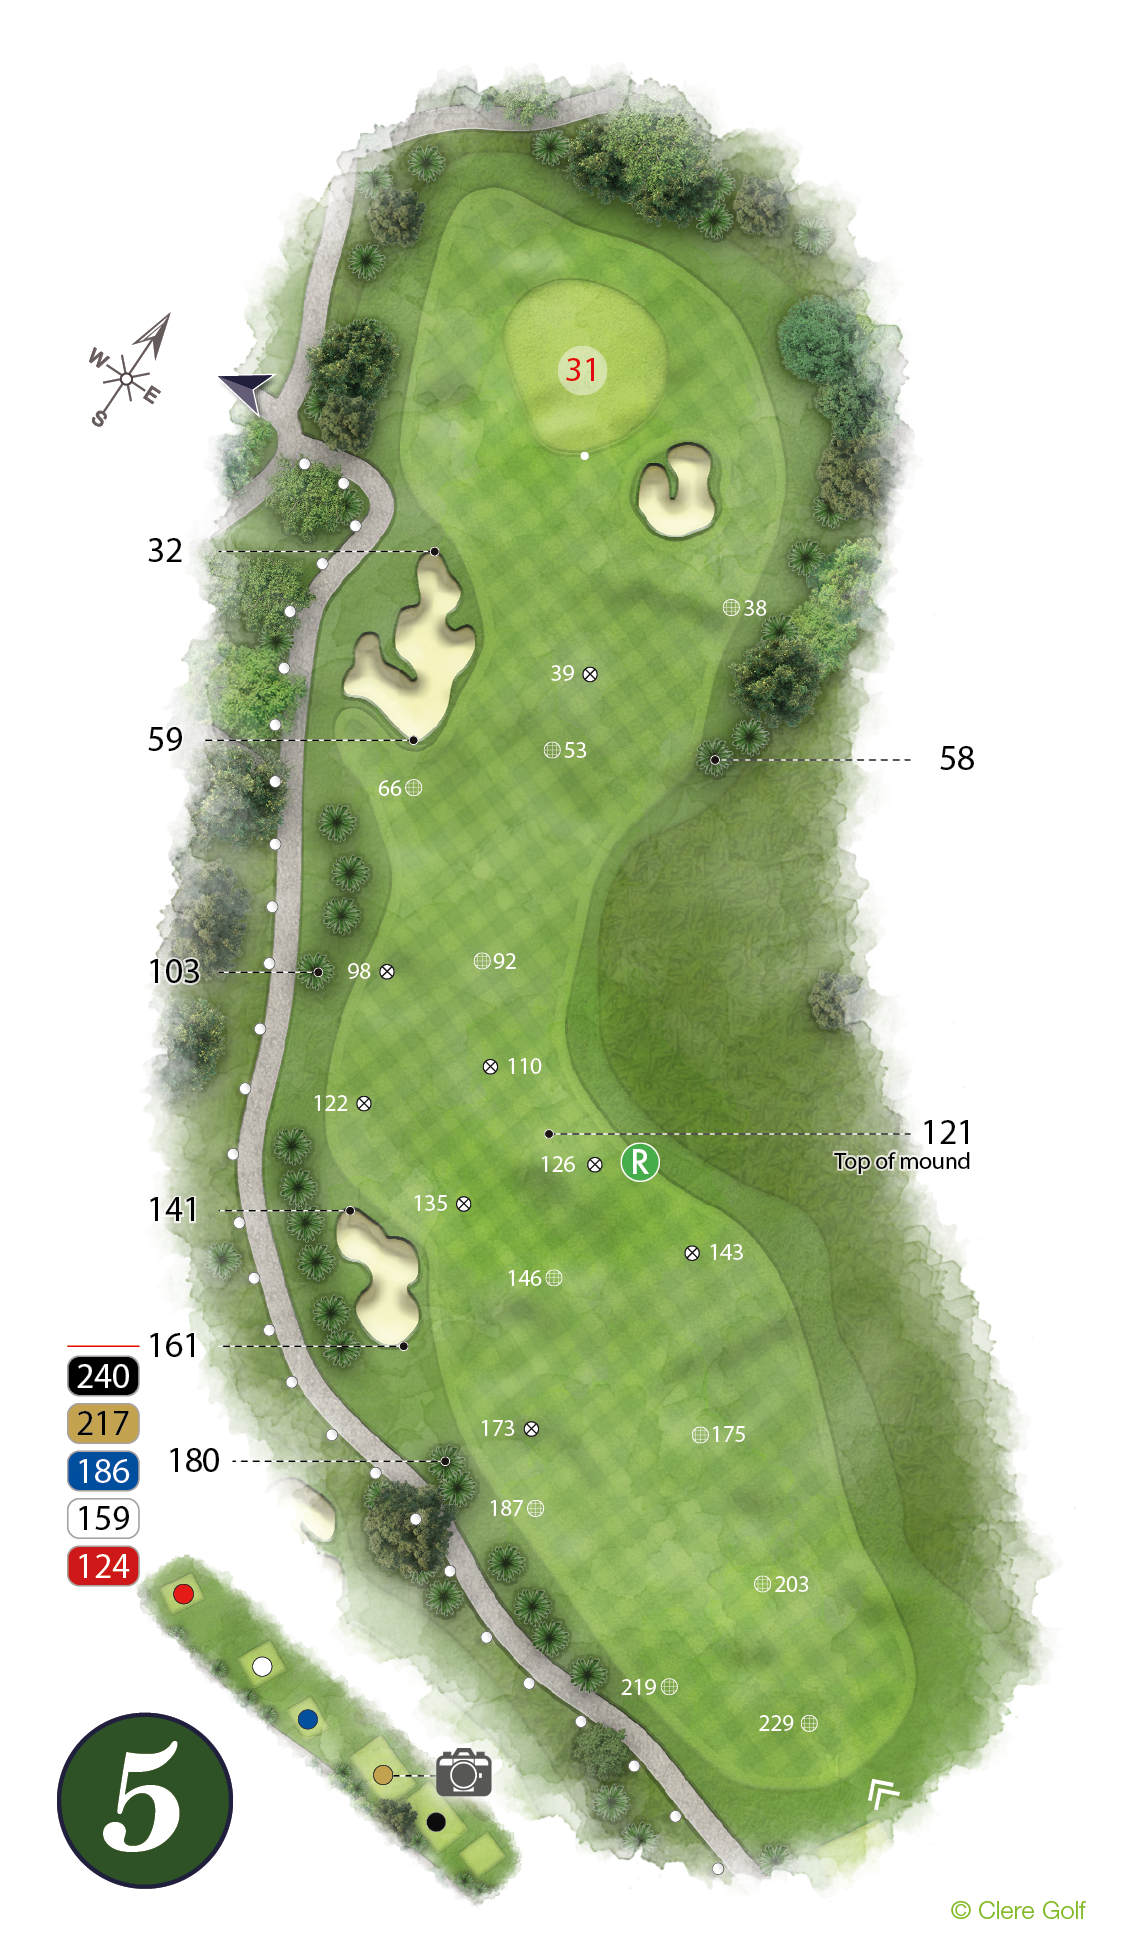

HOLE 5 PAR 4
Pro’s Tip:
A right-angled dog leg par 4. This hole definitely suits a fade. Place your tee shot past the bunker on the left to get a view to the green.
Designer’s Notes:
A right-angled dog leg par 4. This hole definitely suits a fade. Place your tee shot past the bunker on the left to get a view to the green.
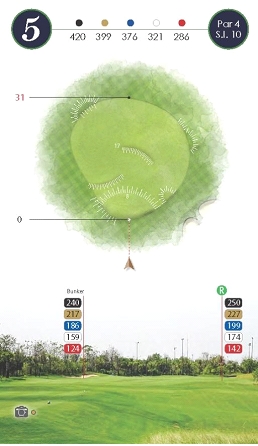
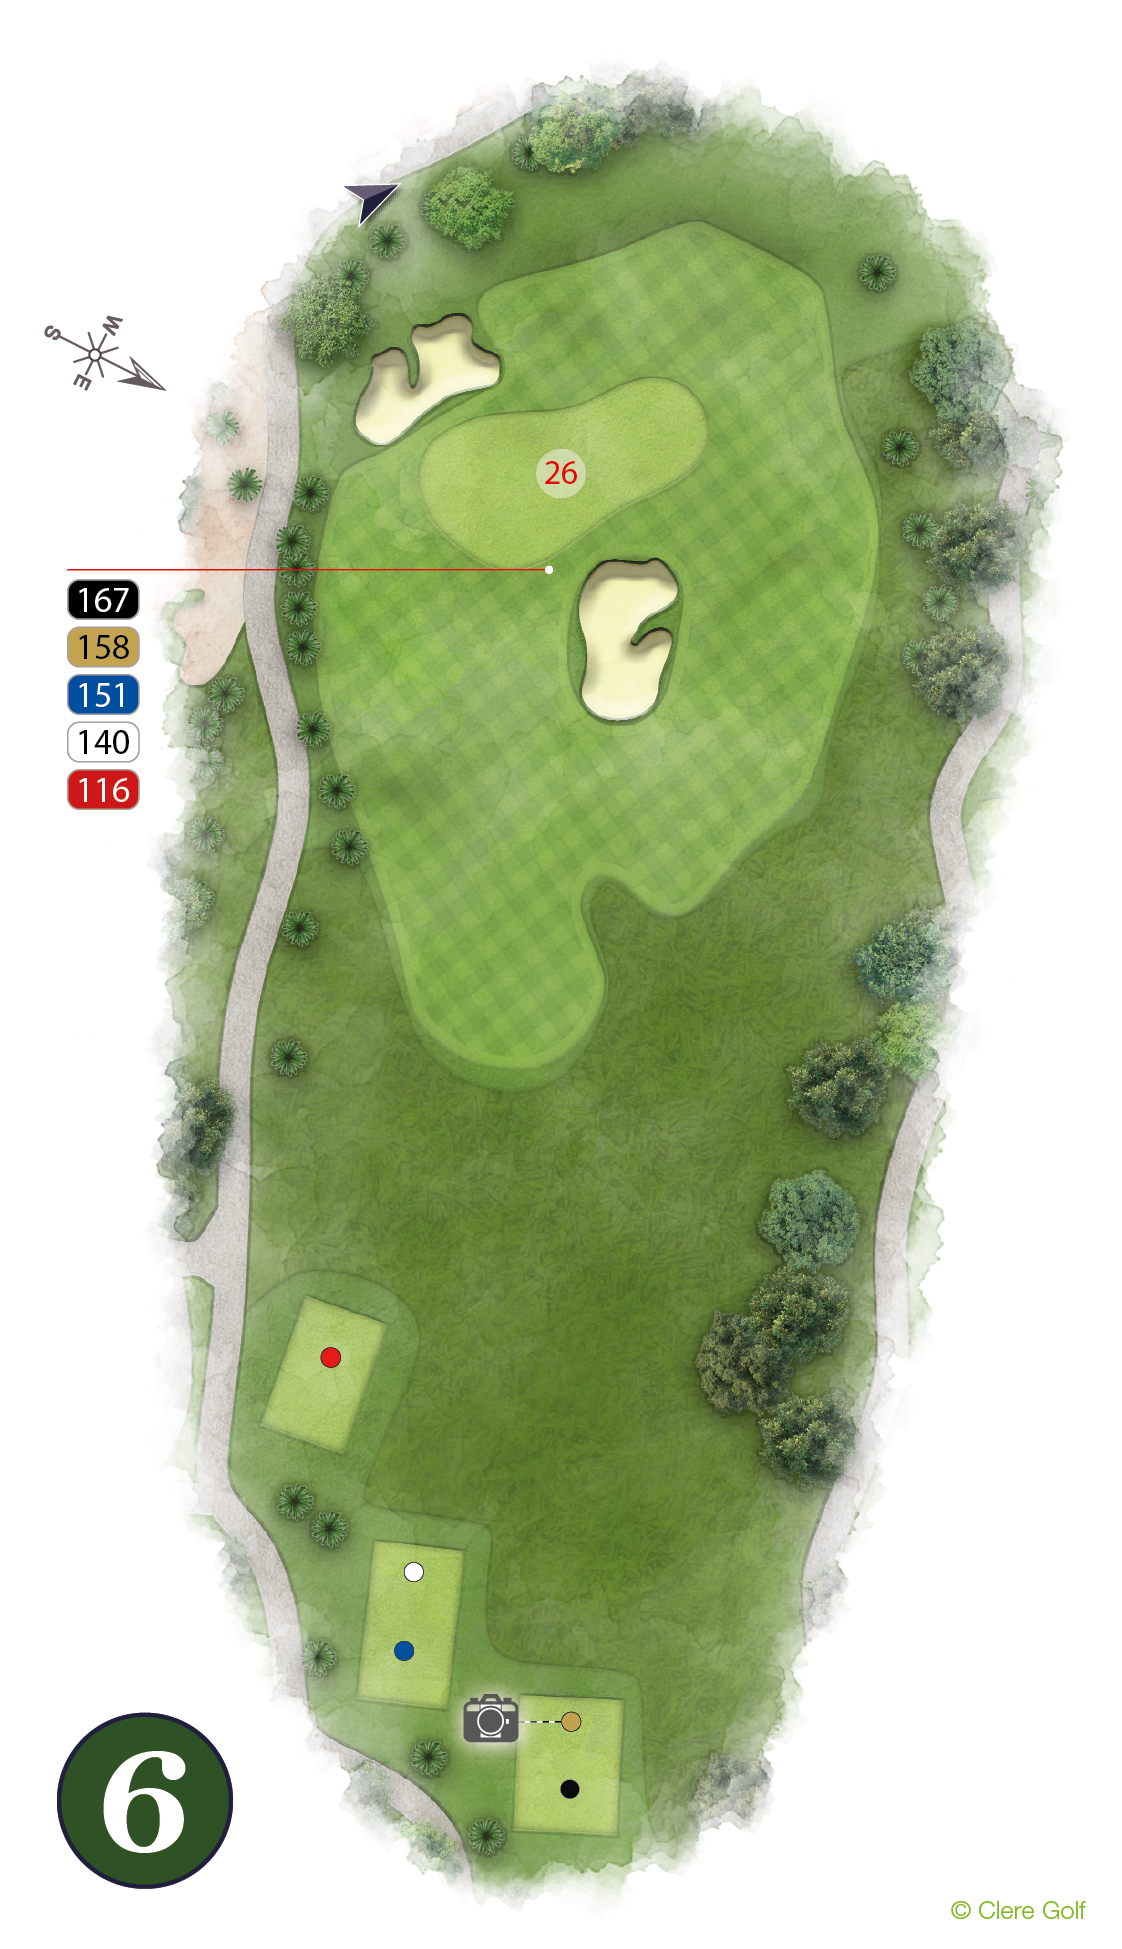

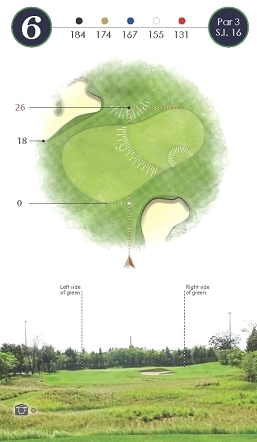
HOLE 6 PAR 3
Pro’s Tip:
Long downhill par 3. This shallow green makes balls that land on the green tough to stop. If your hitting a long iron or wood into the green consider landing it short and rolling it up.
Designer’s Notes:
Long downhill par 3. This shallow green makes balls that land on the green tough to stop. If your hitting a long iron or wood into the green consider landing it short and rolling it up.
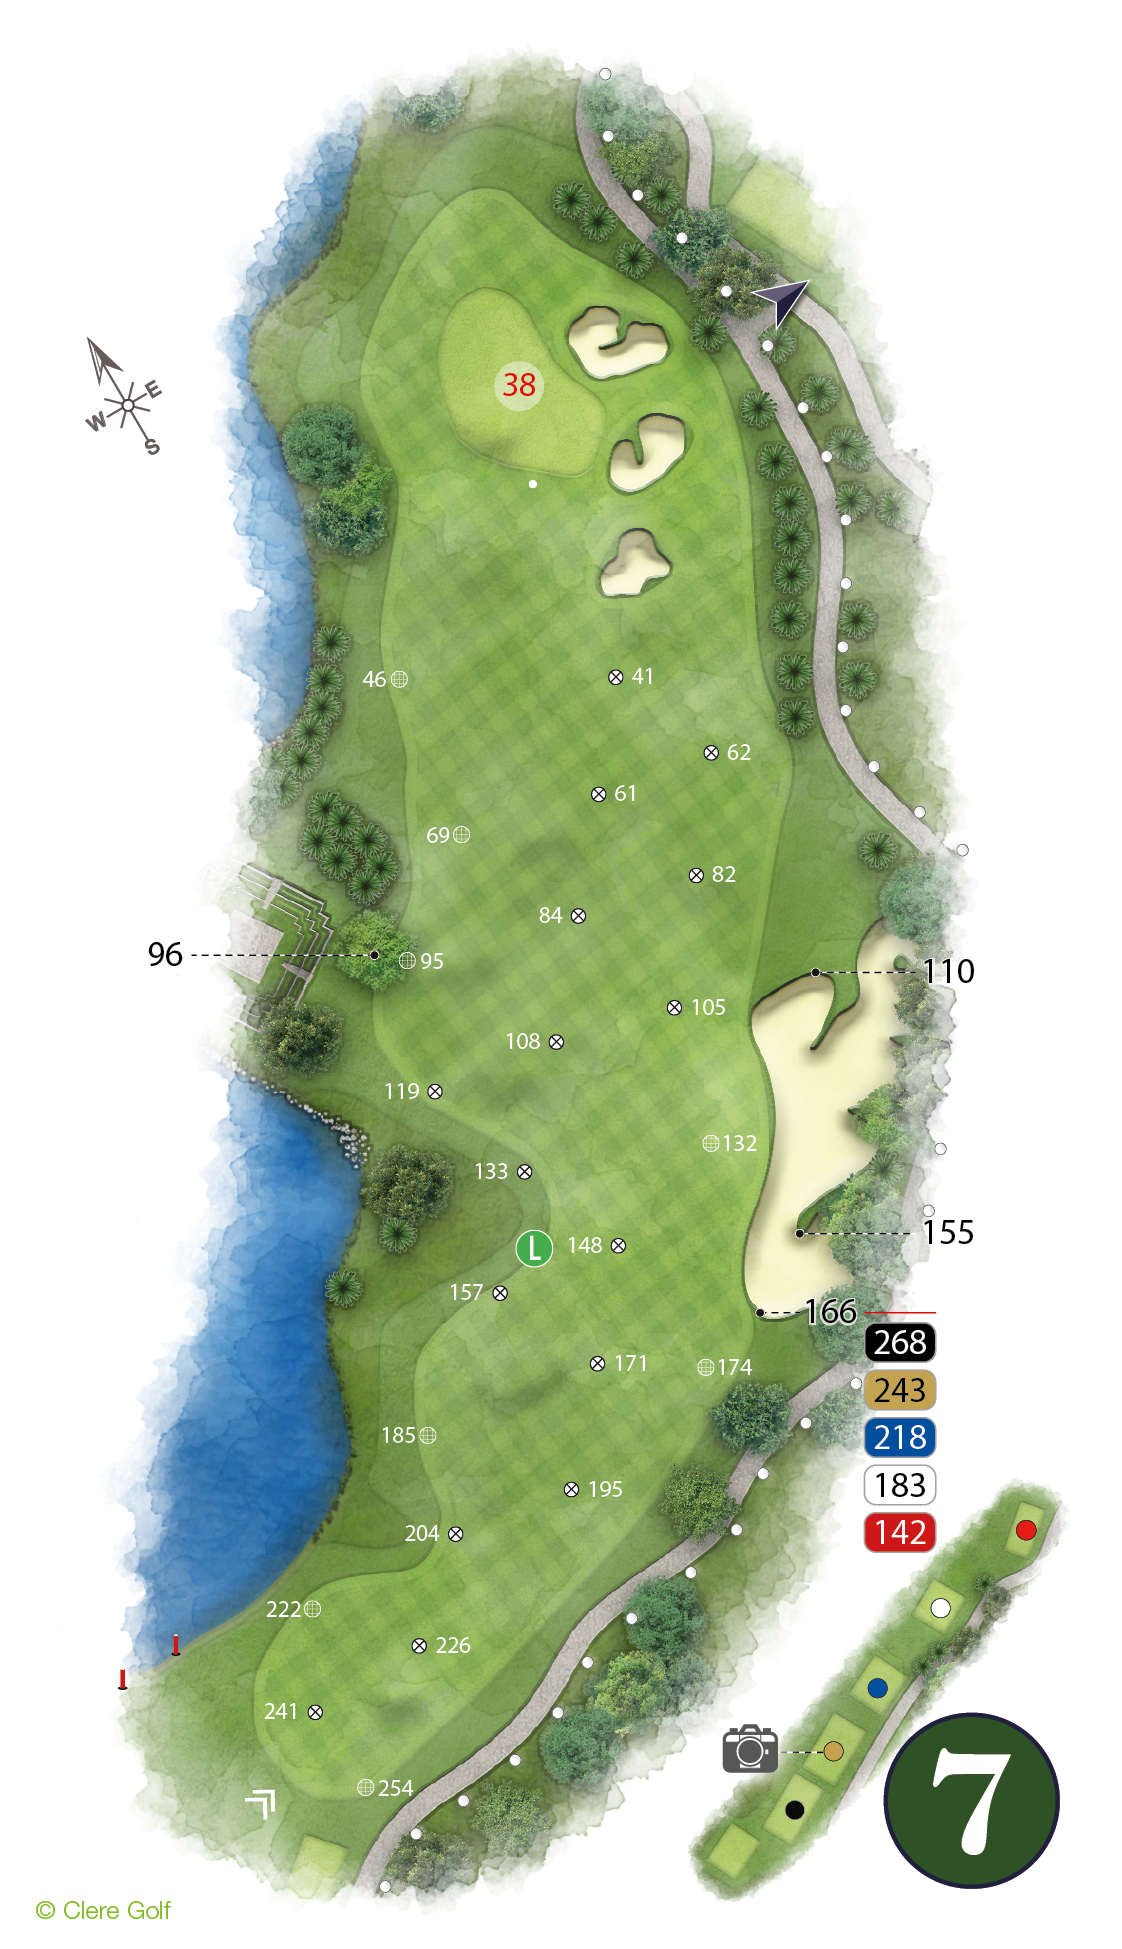

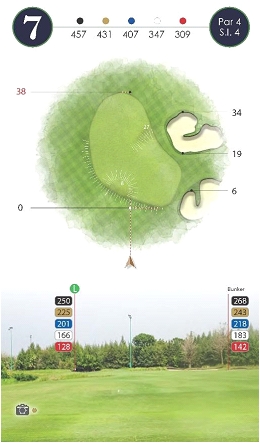
HOLE 7 PAR 4
Pro’s Tip:
Long sweeping dog-leg left. longer hitters can cut the corner which will leave a mid-iron to the green. The fairway bunker on the right is shallow so a long iron or wood can be used to reach the green if your ball rolls in.
Designer’s Notes:
Long sweeping dog-leg left. longer hitters can cut the corner which will leave a mid-iron to the green. The fairway bunker on the right is shallow so a long iron or wood can be used to reach the green if your ball rolls in.
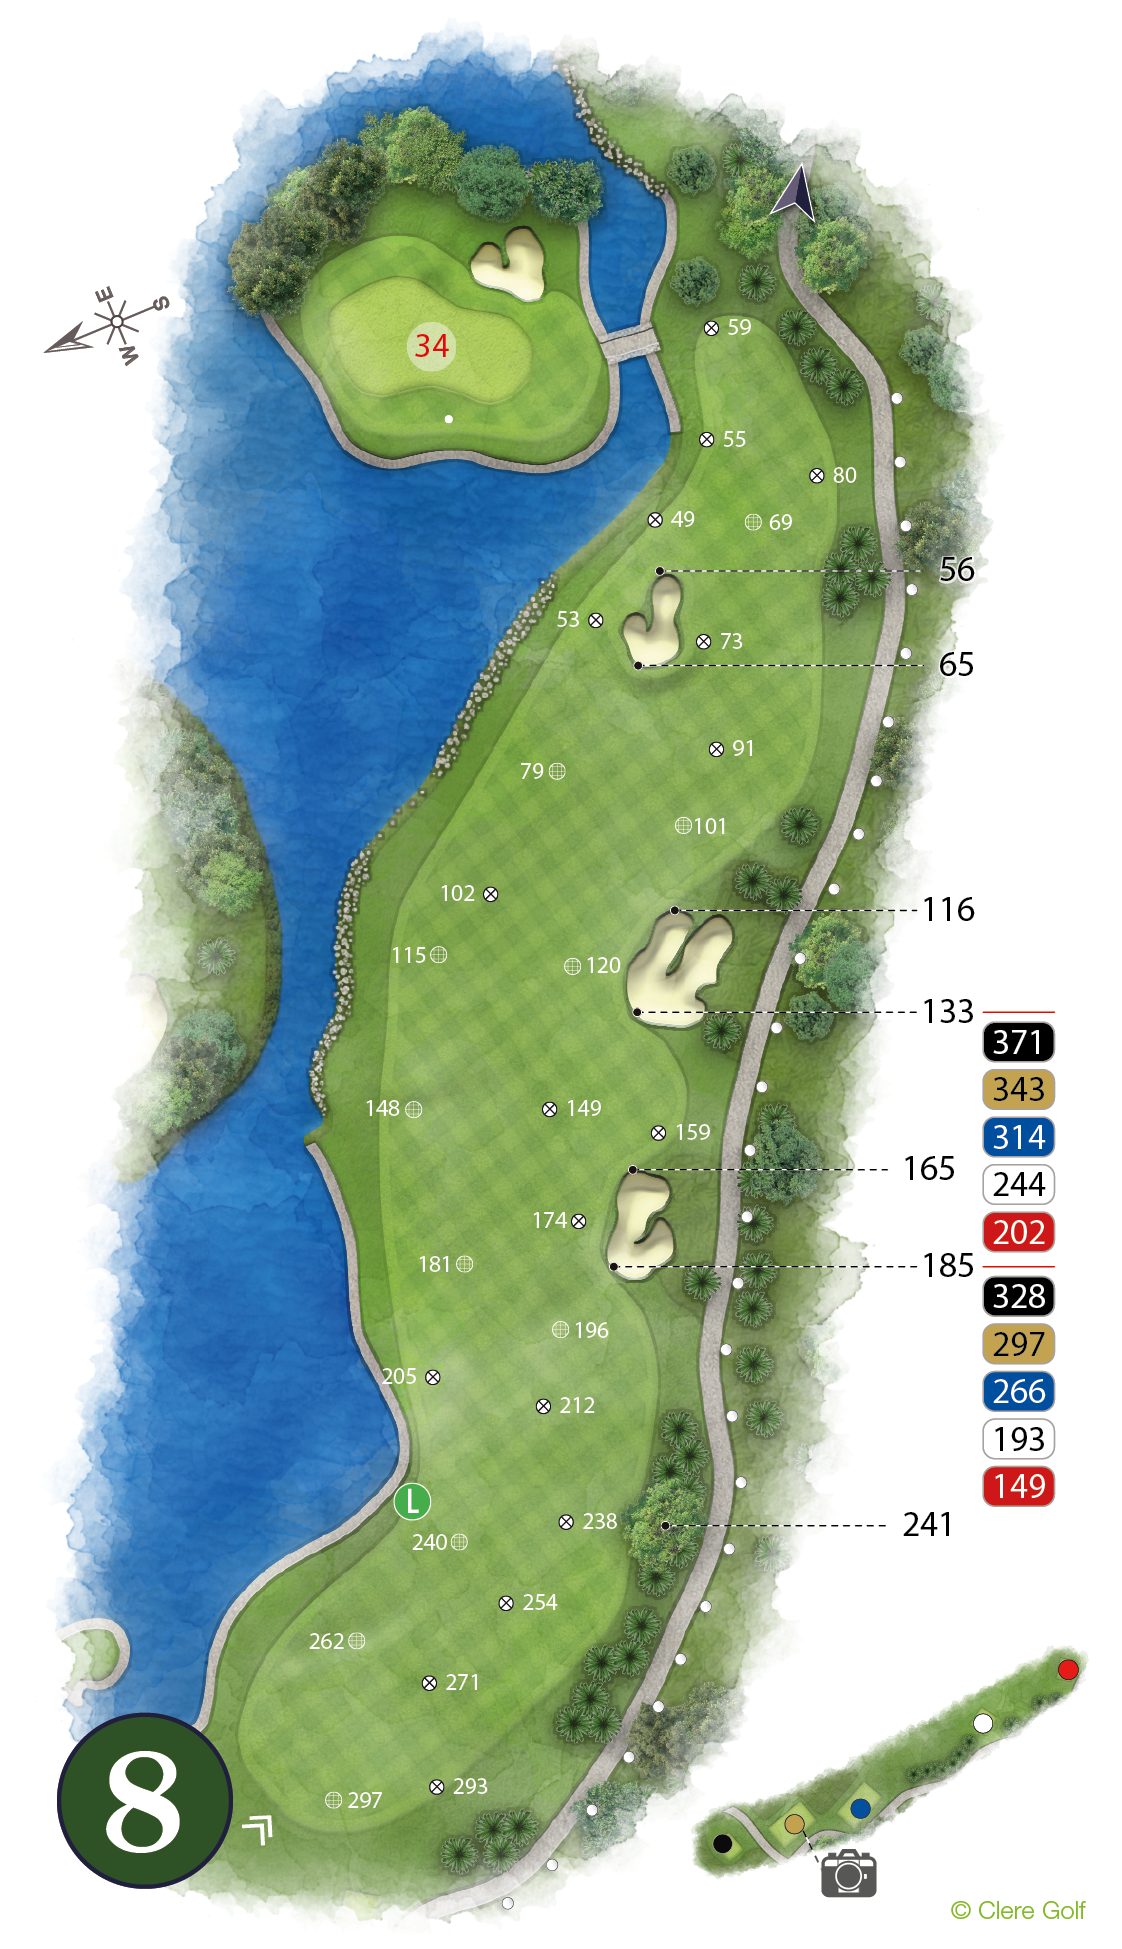

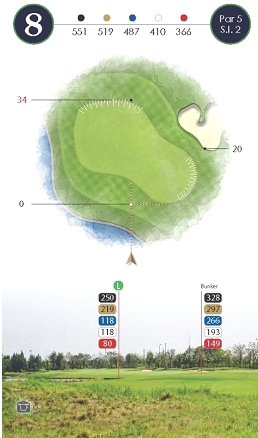
HOLE 8 PAR 5
Pro’s Tip:
The West course signature hole. For your drive beware of the water on the left as it cuts into the fairway and can’t be seen from the tee box. Aim slightly more right to be extra safe. Recommended to lay up rather than go for it for most golfers.
Designer’s Notes:
The West course signature hole. For your drive beware of the water on the left as it cuts into the fairway and can’t be seen from the tee box. Aim slightly more right to be extra safe. Recommended to lay up rather than go for it for most golfers.
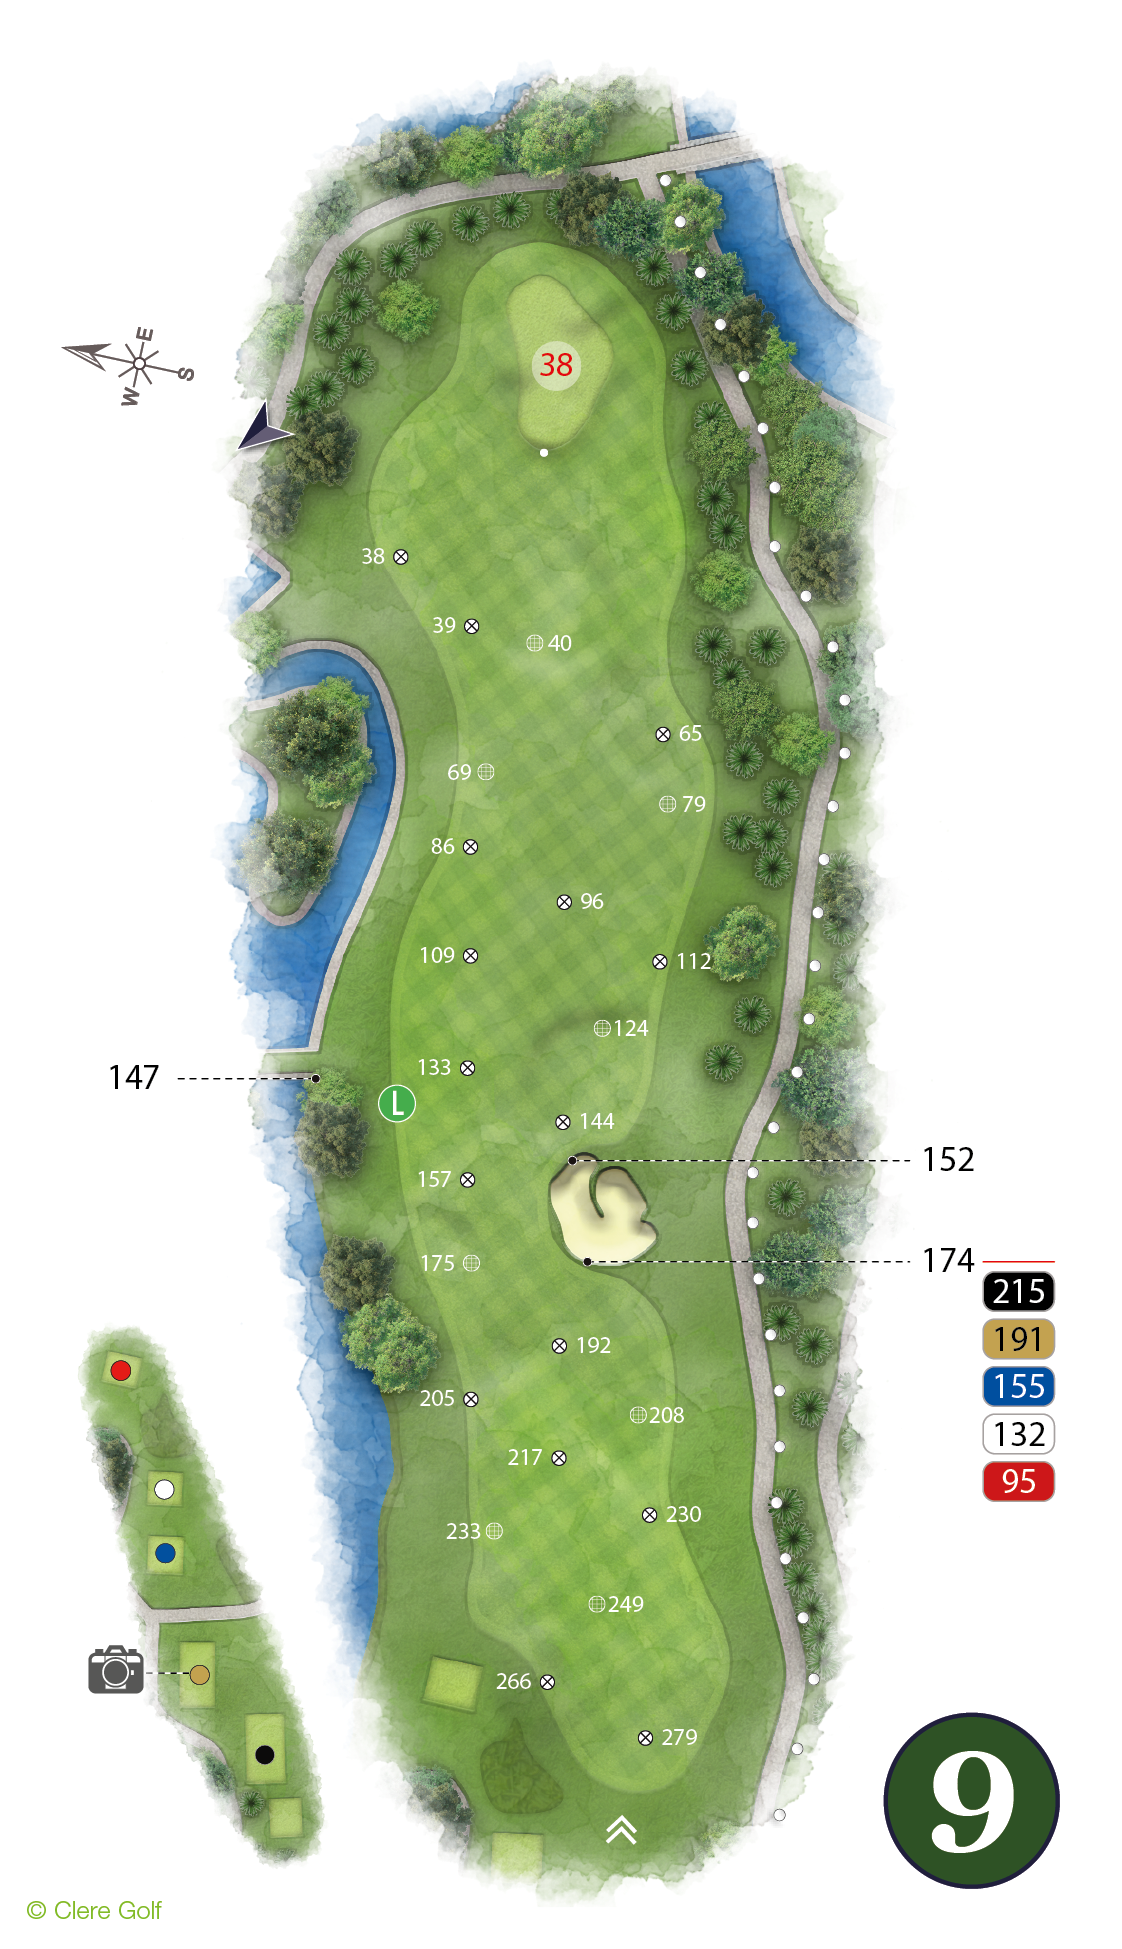
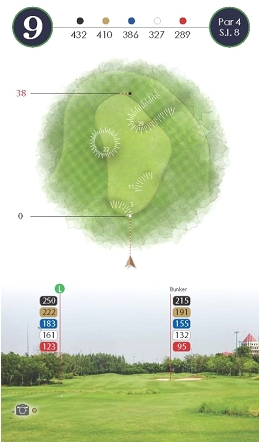
HOLE 9 PAR 4
Pro’s Tip:
Keep your drive down the left-hand side of the fairway, this will avoid the fairway bunker and give you the best view into the green. An accurate approach is needed as this green has run off areas short and left.
Designer’s Notes:
Keep your drive down the left-hand side of the fairway, this will avoid the fairway bunker and give you the best view into the green. An accurate approach is needed as this green has run off areas short and left.
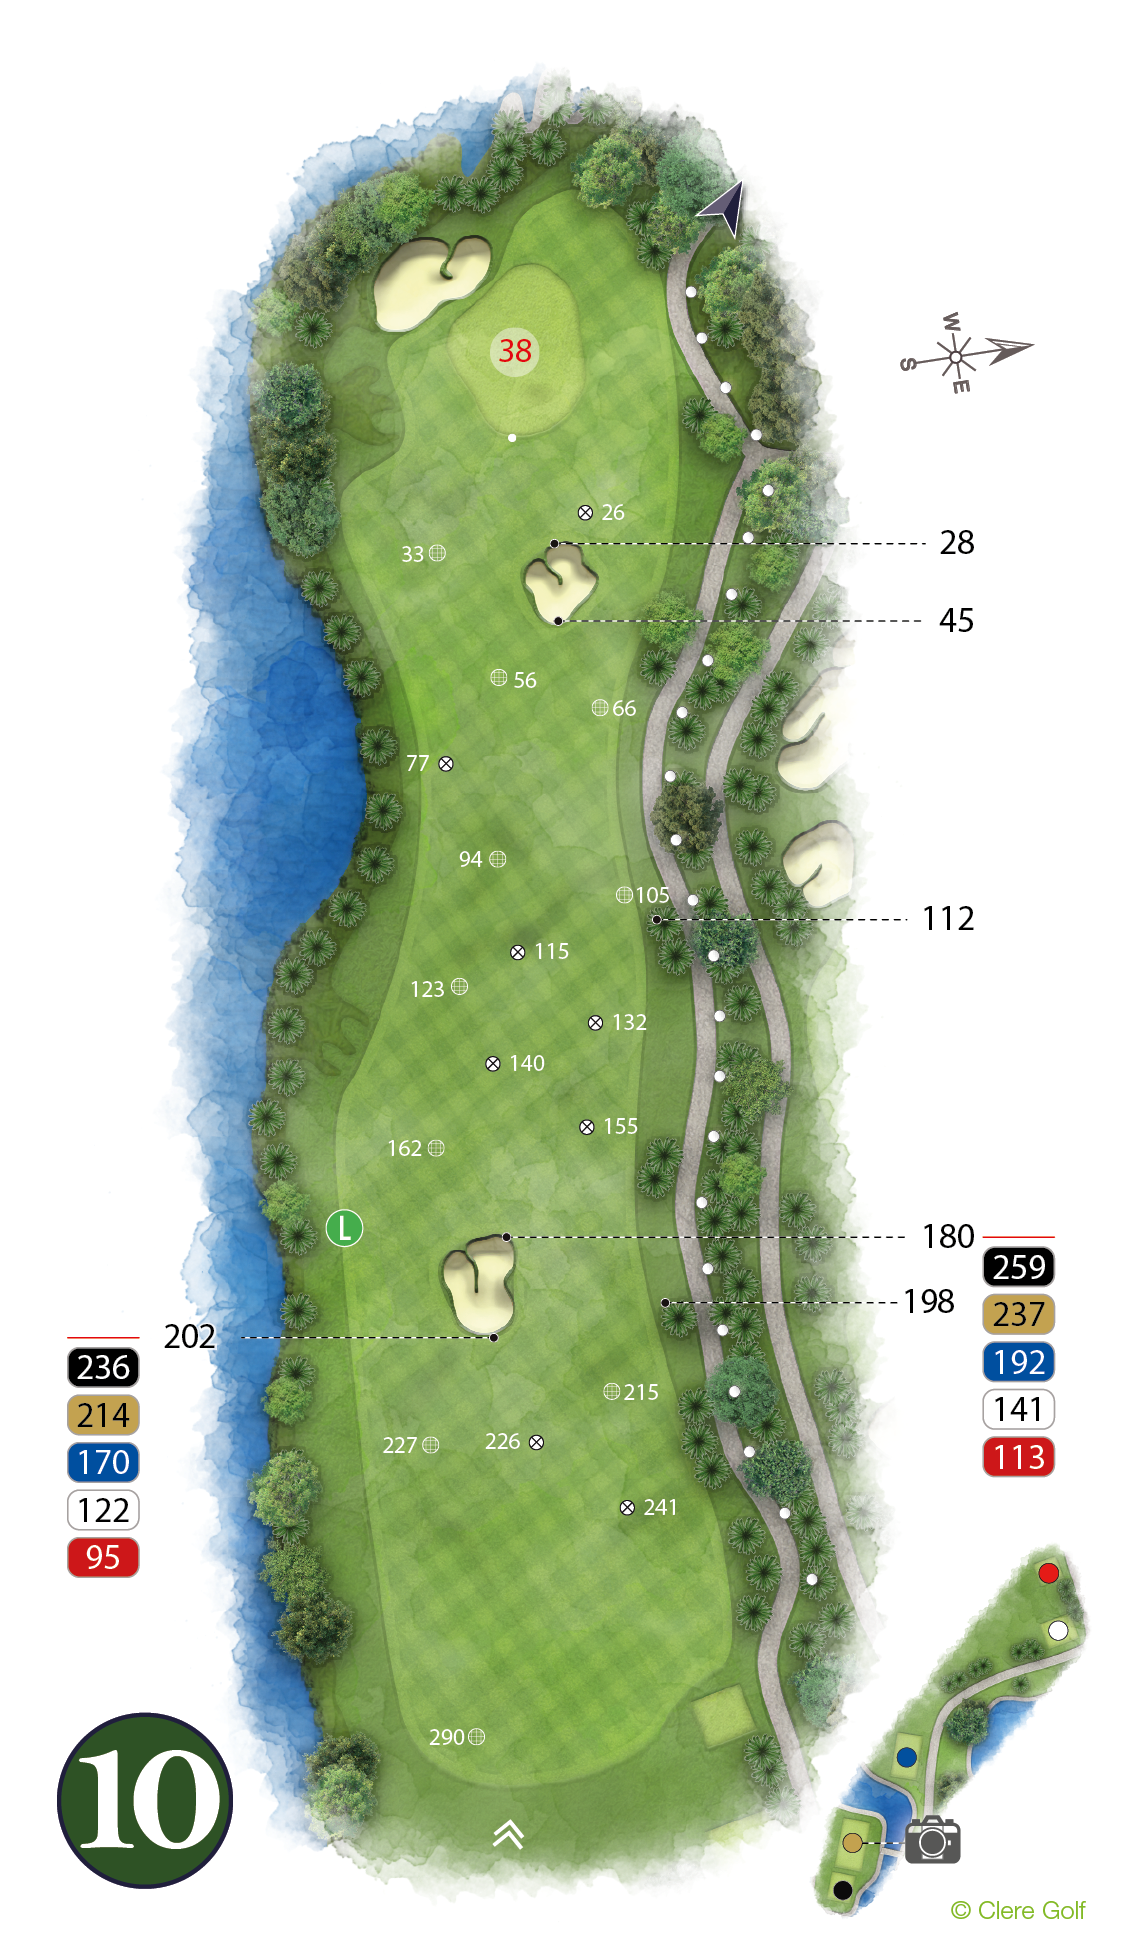

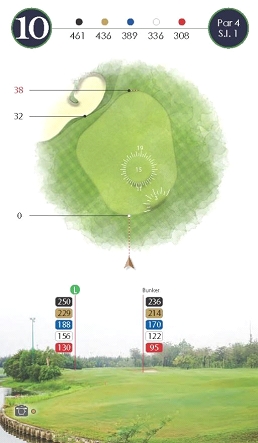
HOLE 10 PAR 4
Pro’s Tip:
Ranked the hardest hole on the course. This long par 4 demands a straight drive as It has 2 deep bunkers in the middle of a narrow fairway with out of bounds right and water left.
Designer’s Notes:
Ranked the hardest hole on the course. This long par 4 demands a straight drive as It has 2 deep bunkers in the middle of a narrow fairway with out of bounds right and water left.

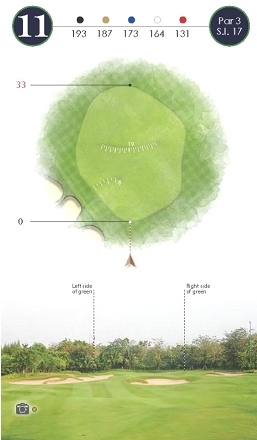
HOLE 11 PAR 3
Pro’s Tip:
A long par 3, leaving your ball short is better than long here. As you will be chipping or putting uphill.
Designer’s Notes:
A long par 3, leaving your ball short is better than long here. As you will be chipping or putting uphill.
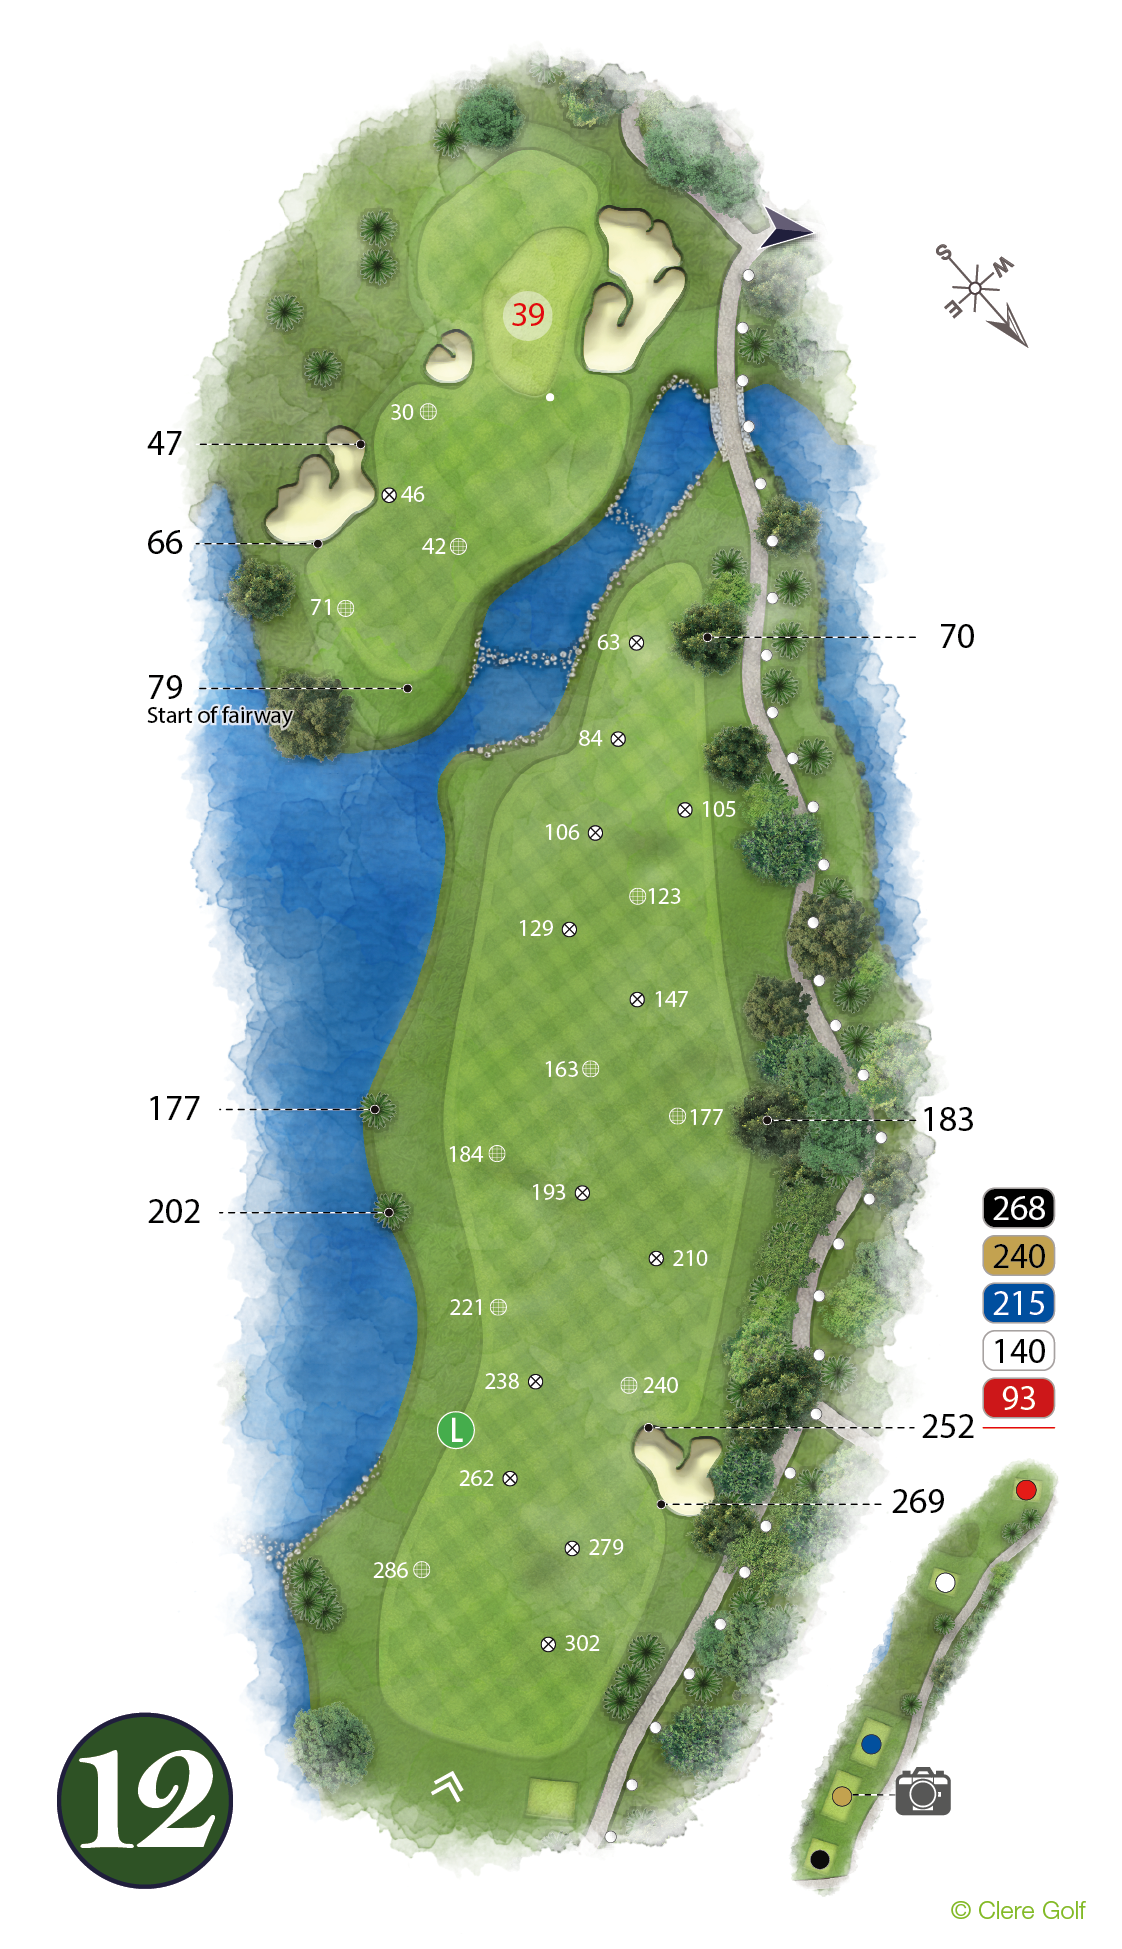

HOLE 12 PAR 5
Pro’s Tip:
A very wide fairway so time to give your drive that extra 10%. Laying up short of the water is advised as the green is elevated so this approach plays 1 or 2 clubs longer.
Designer’s Notes:
A very wide fairway so time to give your drive that extra 10%. Laying up short of the water is advised as the green is elevated so this approach plays 1 or 2 clubs longer.

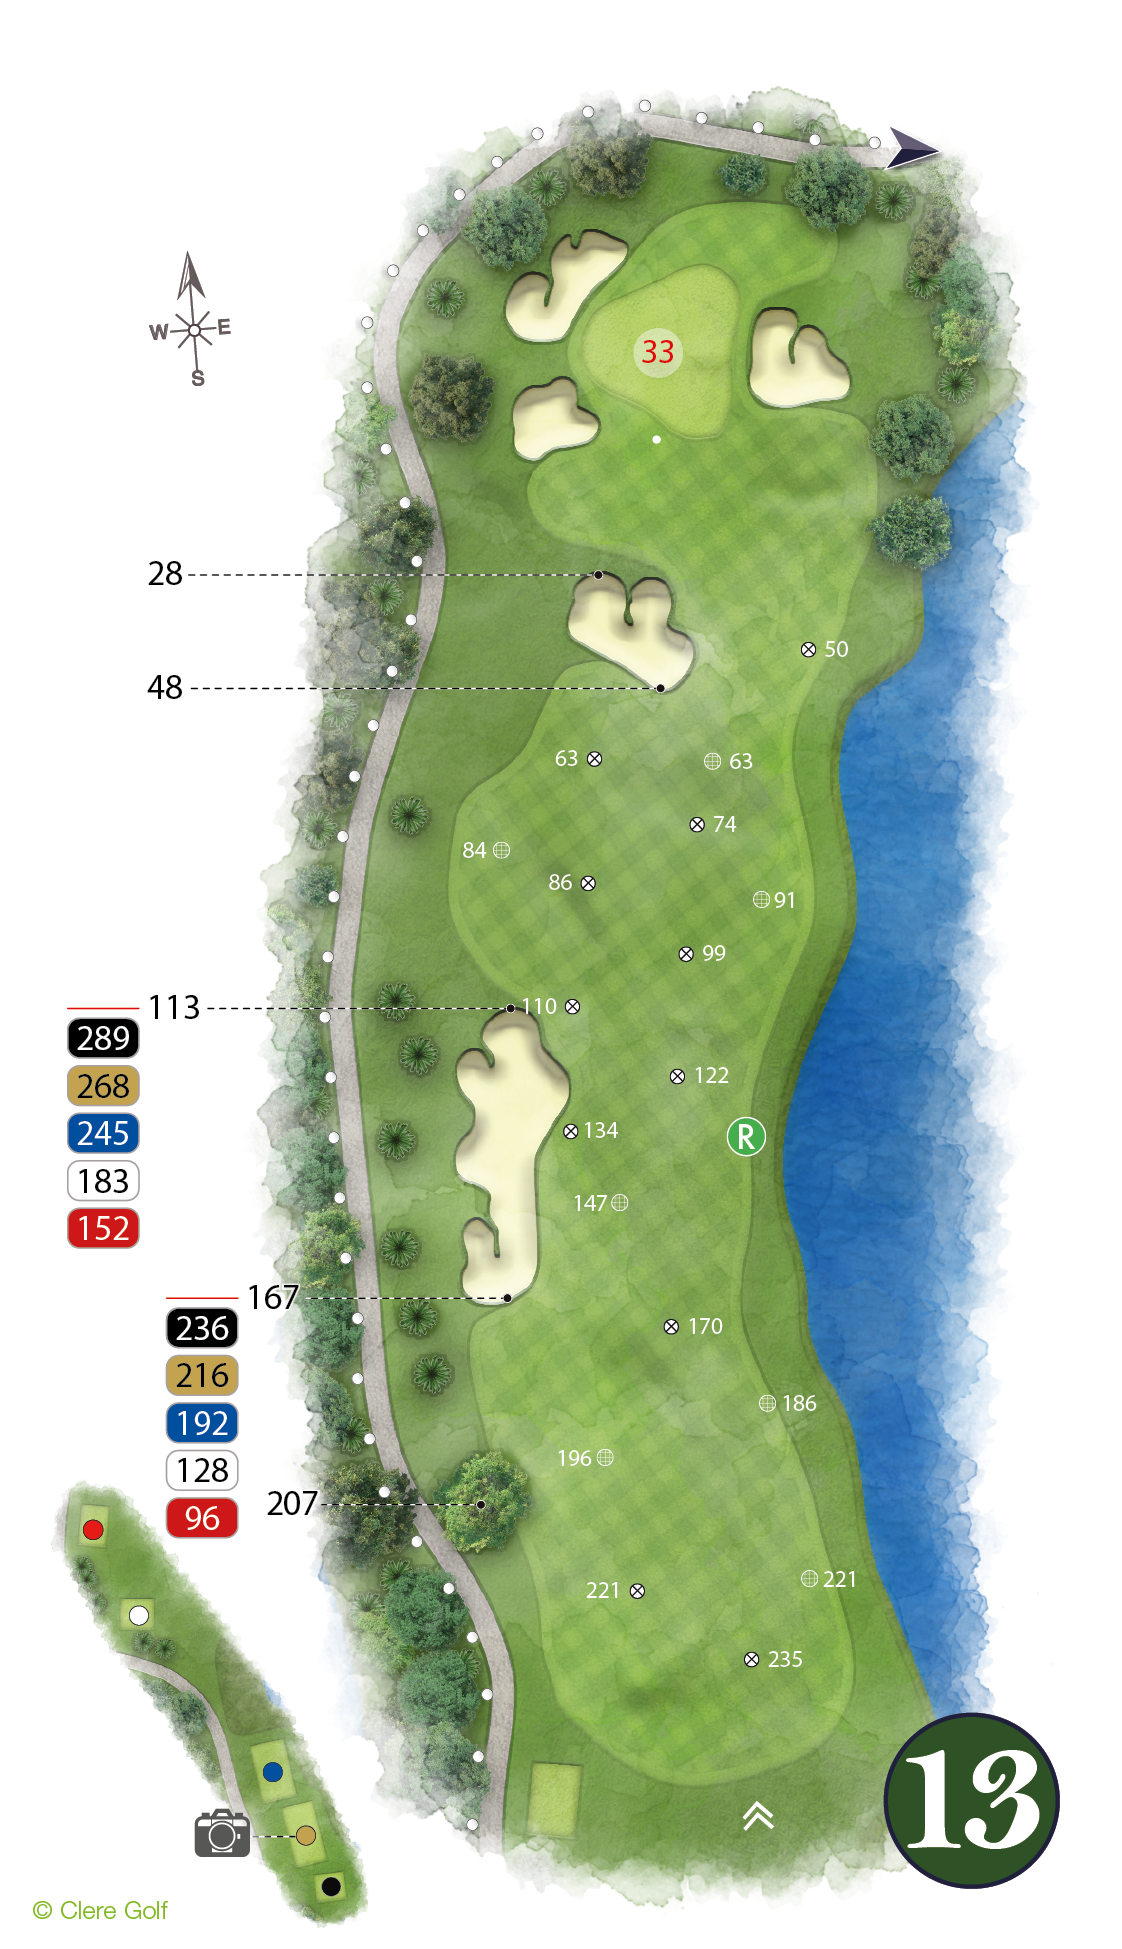
HOLE 13 PAR 4
Pro’s Tip:
Any shot that drifts right will gather into the water. Aim for the fairway bunker on the left it’s a long shallow bunker so a mid to long iron can he hit out to the green if needed.
Designer’s Notes:
Any shot that drifts right will gather into the water. Aim for the fairway bunker on the left it’s a long shallow bunker so a mid to long iron can he hit out to the green if needed.

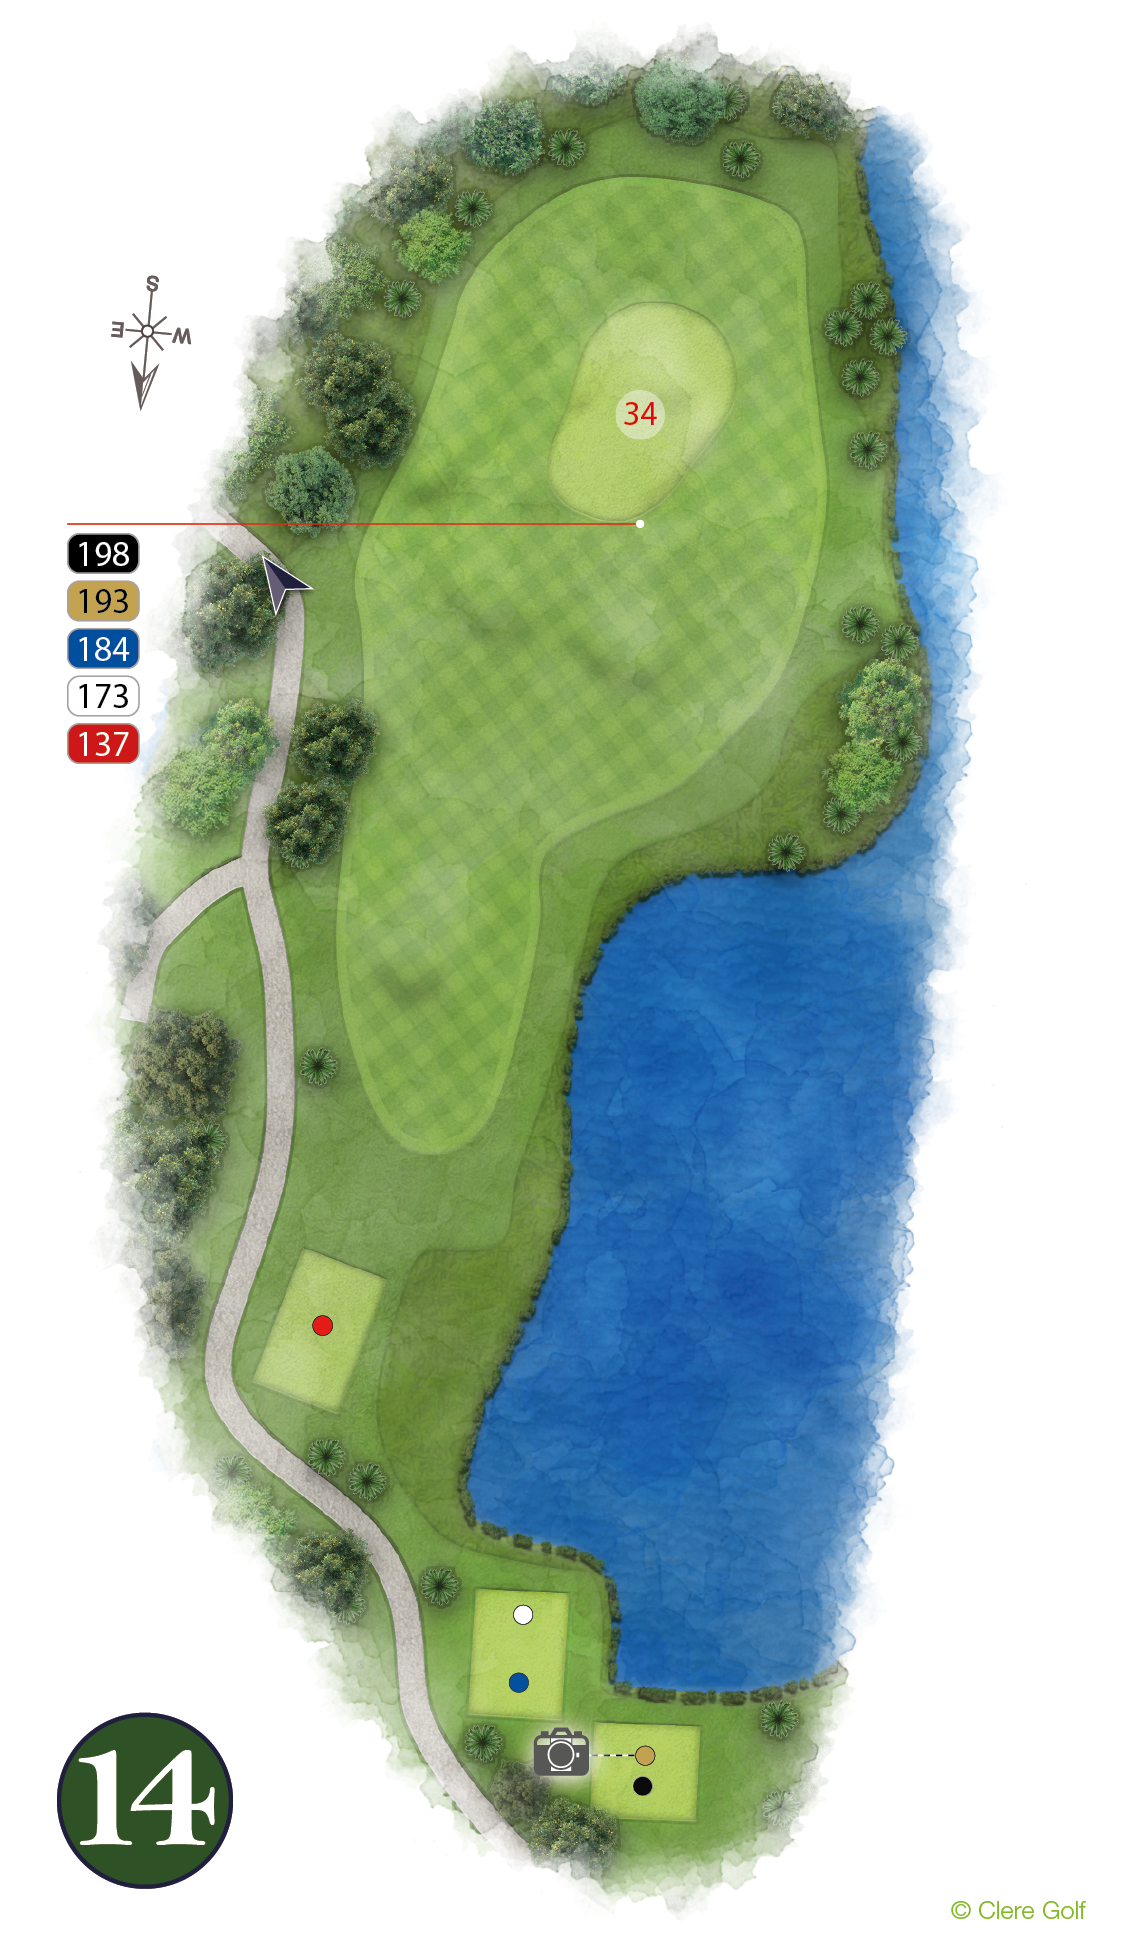
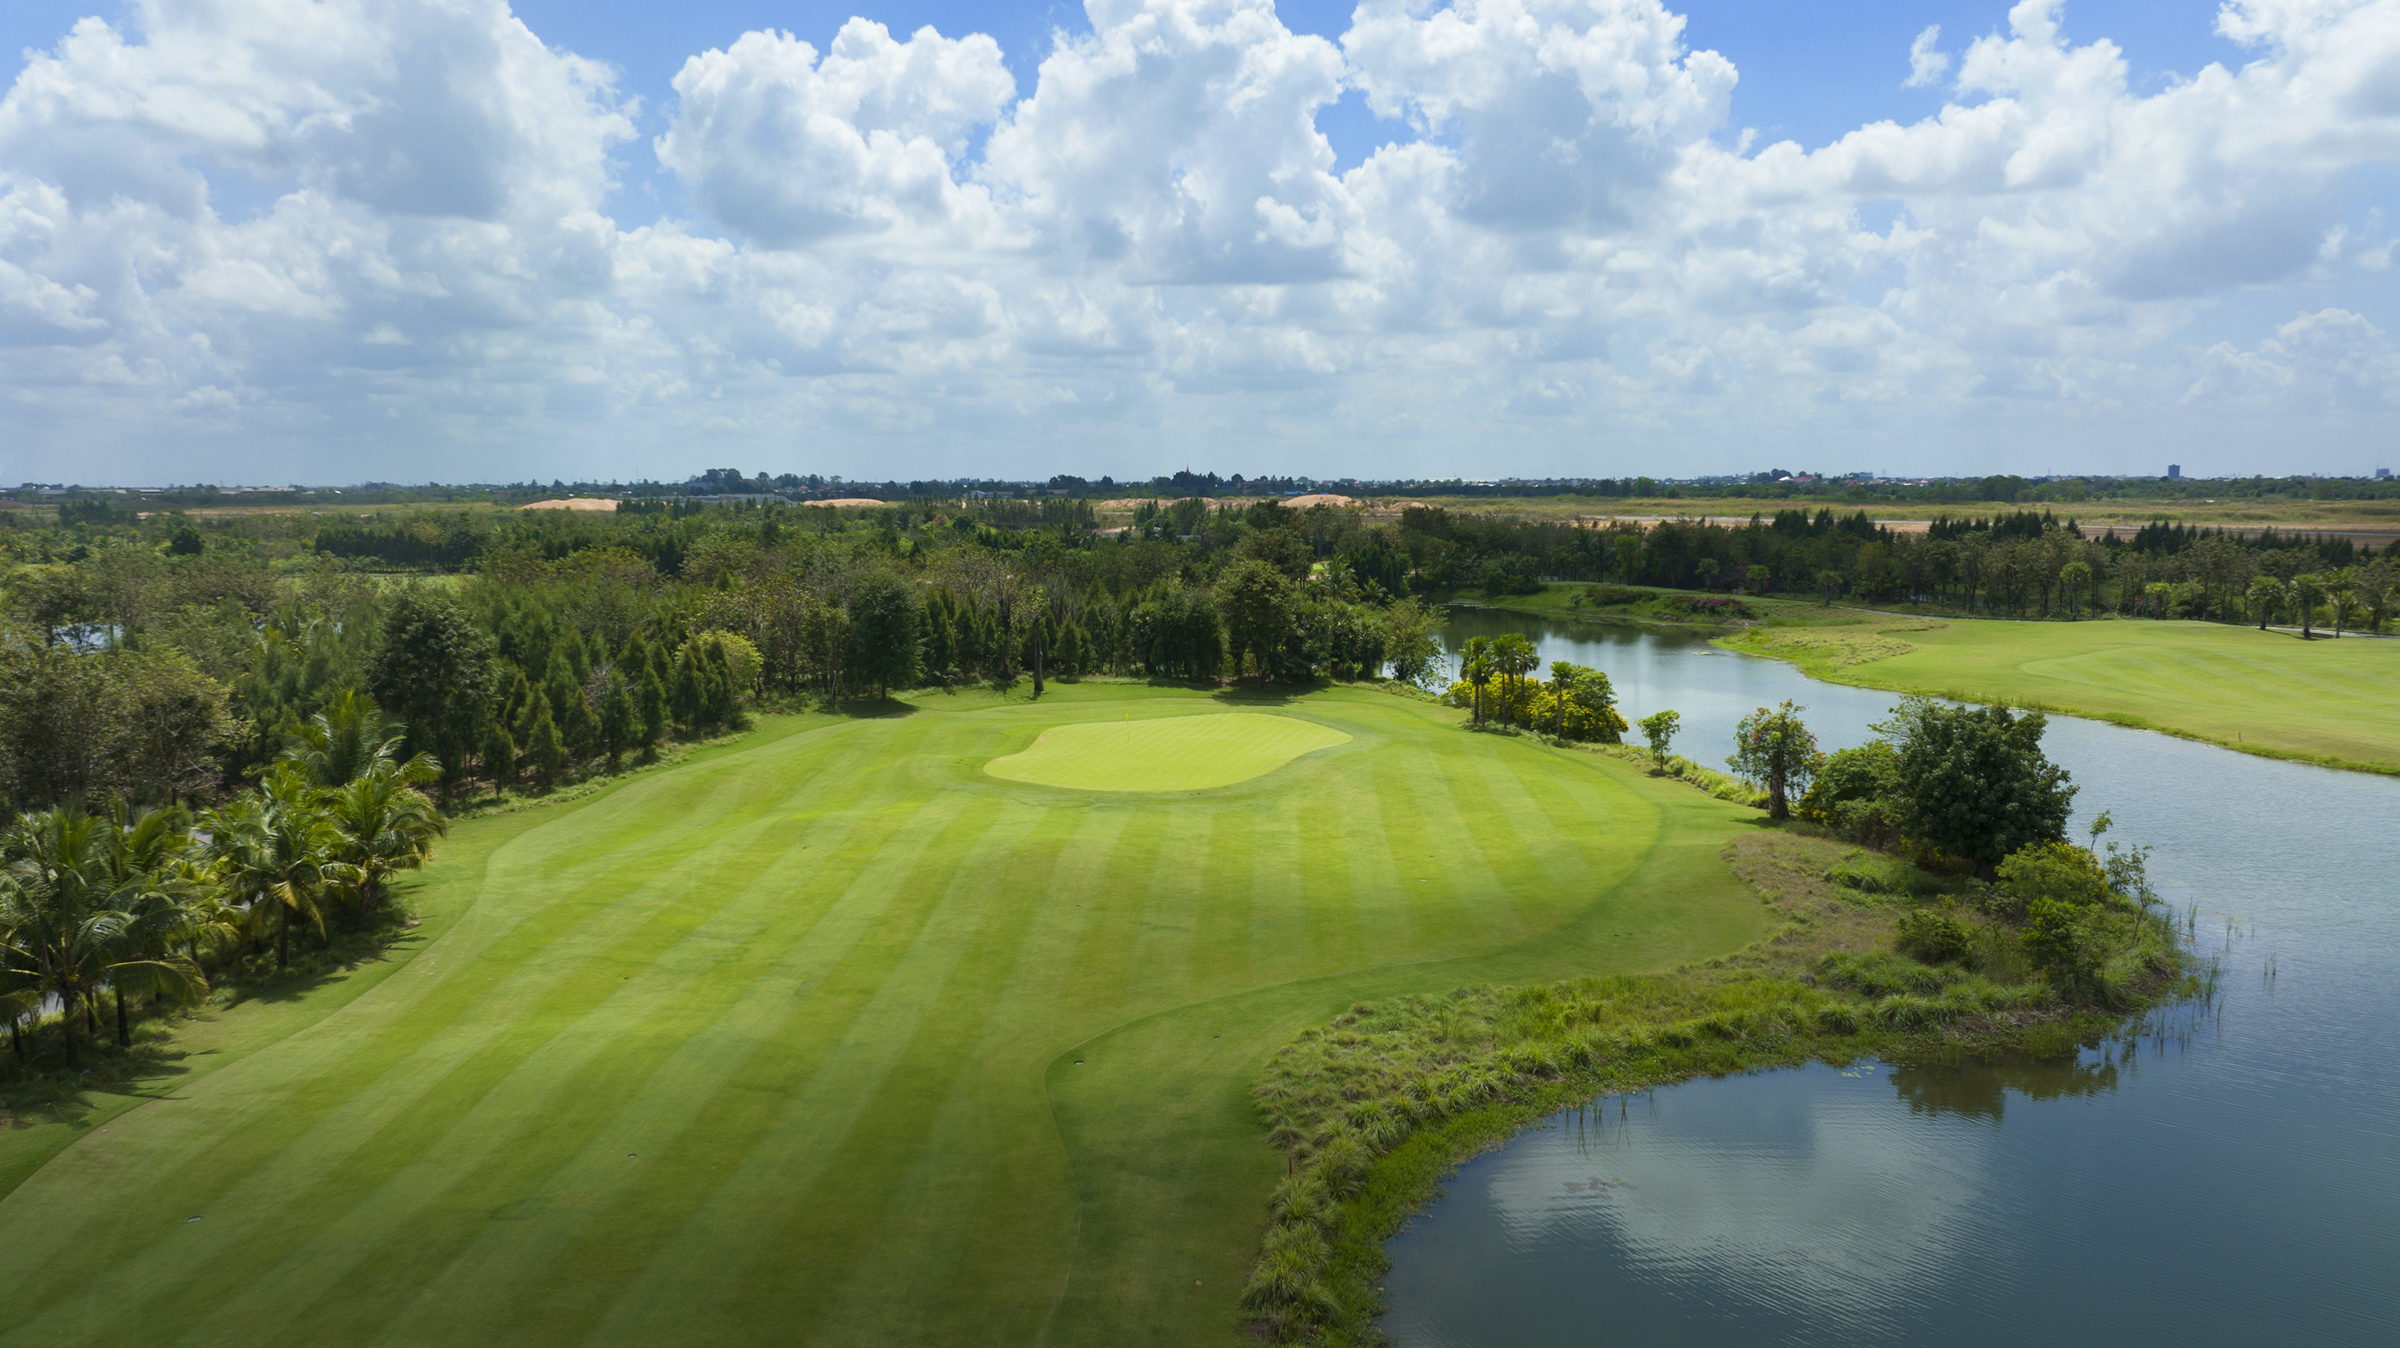
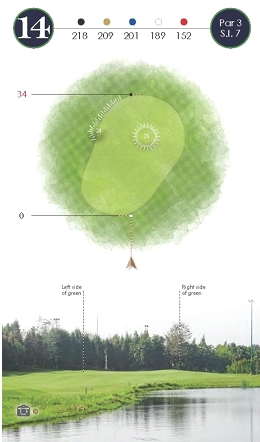
HOLE 14 PAR 3
Pro’s Tip:
The longest par 3 on the West course. Usually playing into the wind so club up! Loads of space around the green so definitely focus on good contract rather than direction.
Designer’s Notes:
The longest par 3 on the West course. Usually playing into the wind so club up! Loads of space around the green so definitely focus on good contract rather than direction.


HOLE 15 PAR 5
Pro’s Tip:
Long dog-leg left par 5. A very wide fairway with lots of space to the right off the tee. Pick your favorite yardage to lay up from and this hole can be made simple.
Designer’s Notes:
Long dog-leg left par 5. A very wide fairway with lots of space to the right off the tee. Pick your favorite yardage to lay up from and this hole can be made simple.


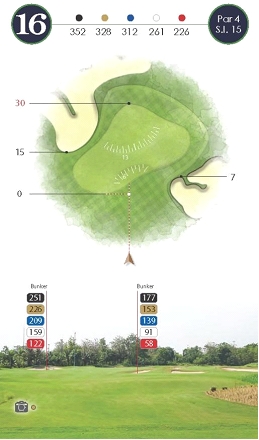
HOLE 16 PAR 4
Pro’s Tip:
A drivable par 4 for the longest hitters. For the average golfer pick a line left or right of the middle bunker and get as close to the green as you can. The green has a bowl at the back making for tough pin locations. Take extra care on the short putts for this hole.
Designer’s Notes:
A drivable par 4 for the longest hitters. For the average golfer pick a line left or right of the middle bunker and get as close to the green as you can. The green has a bowl at the back making for tough pin locations. Take extra care on the short putts for this hole.
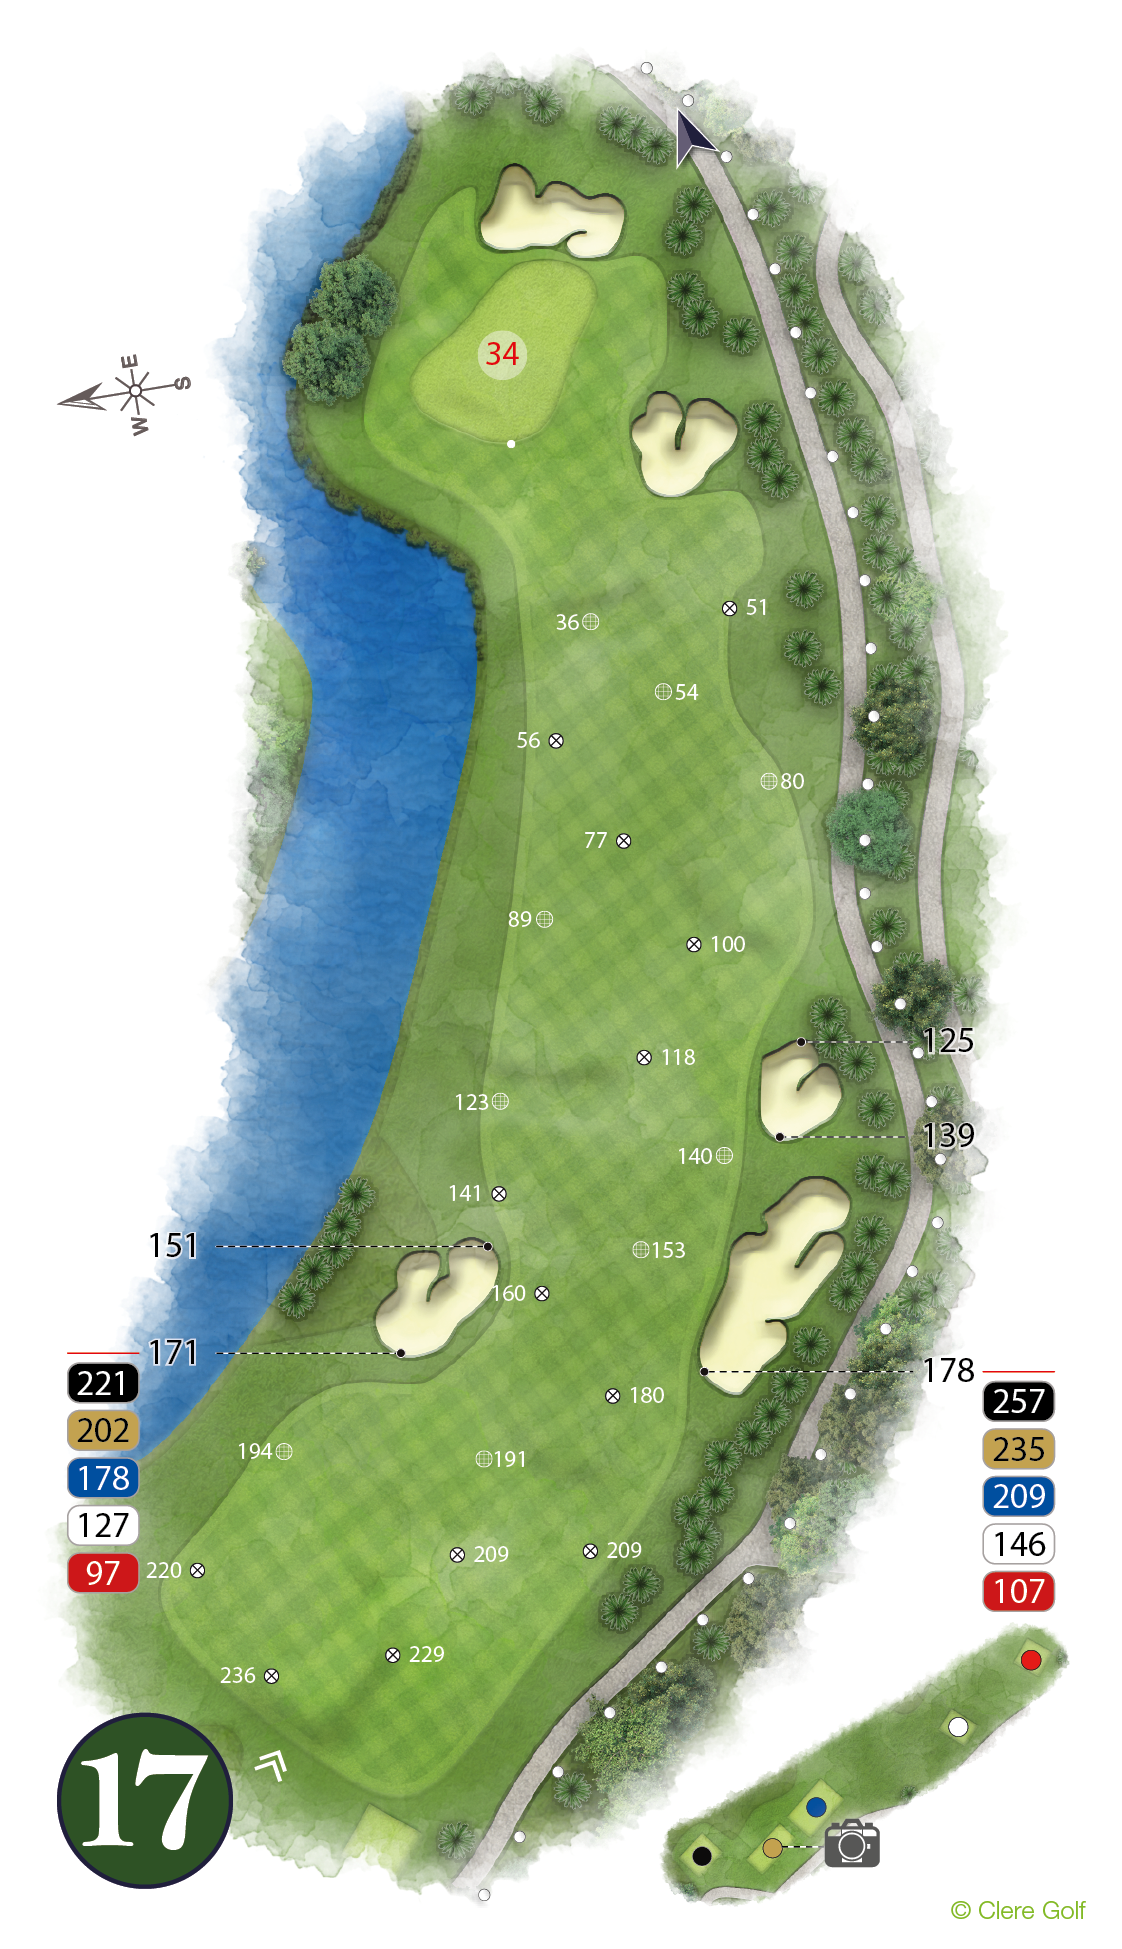

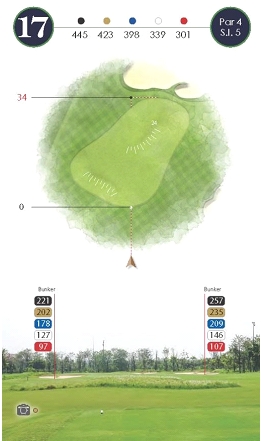
HOLE 17 PAR 4
Pro’s Tip:
Find the fairway and this will set you up for a chance to hit a mid to long iron into this green. With 3 tiers this green has seen many 3 putts.
Designer’s Notes:
Find the fairway and this will set you up for a chance to hit a mid to long iron into this green. With 3 tiers this green has seen many 3 putts.
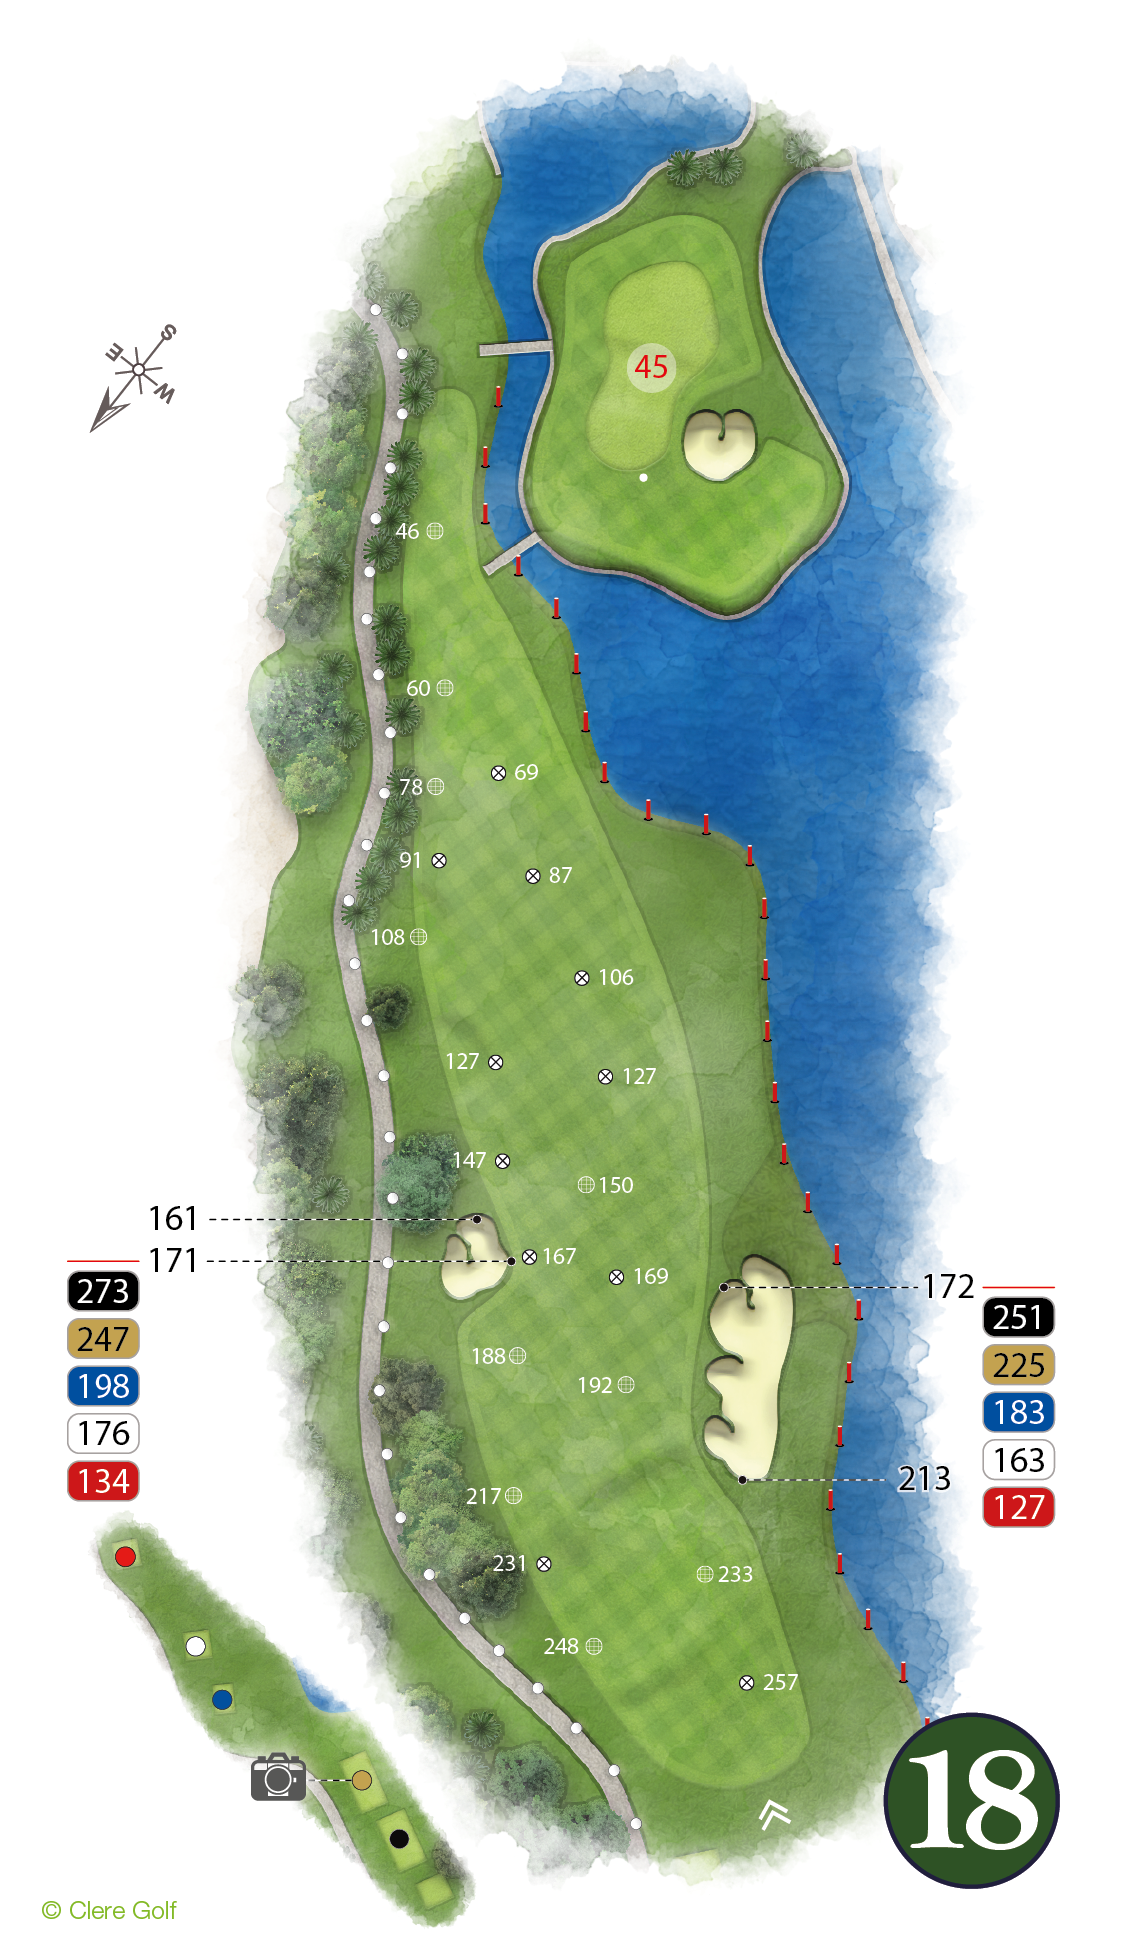

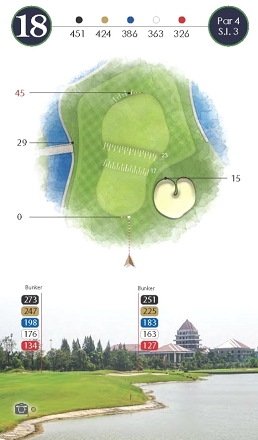
HOLE 18 PAR 4
Pro’s Tip:
A tough finishing hole. The tee shot demands a straight shot with fairway bunkers positioned at most golfers landing spots. If your brave have a go at getting over the water in 2 shots. If not, lay-up far left and play it as a 3 shotter.
Designer’s Notes:
A tough finishing hole. The tee shot demands a straight shot with fairway bunkers positioned at most golfers landing spots. If your brave have a go at getting over the water in 2 shots. If not, lay-up far left and play it as a 3 shotter.